

You spent good money on quality dried herbs. You picked the right strain, the right source, maybe even the right RAW cone to pack them in. But if your storage game is off, none of that matters. Finding the best way to store dried herbs starts with understanding what actually degrades them, and it's not just time. Light, heat, humidity, and oxygen each chip away at flavor, aroma, and potency faster than most people realize.
At Green Blazer, we sell over 100 million RAW cones annually, and we hear from customers all the time who load up a perfectly crafted cone only to get a harsh, flat session because their herb dried out or lost its punch in storage. Proper storage protects your investment and makes every smoke noticeably better, whether you're a casual user or a commercial producer managing bulk inventory.
This guide covers the containers, conditions, and common mistakes that determine whether your dried herbs stay fresh for weeks or fall apart in days. You'll walk away with a clear, practical system for long-term storage that actually works.
What makes dried herbs lose freshness
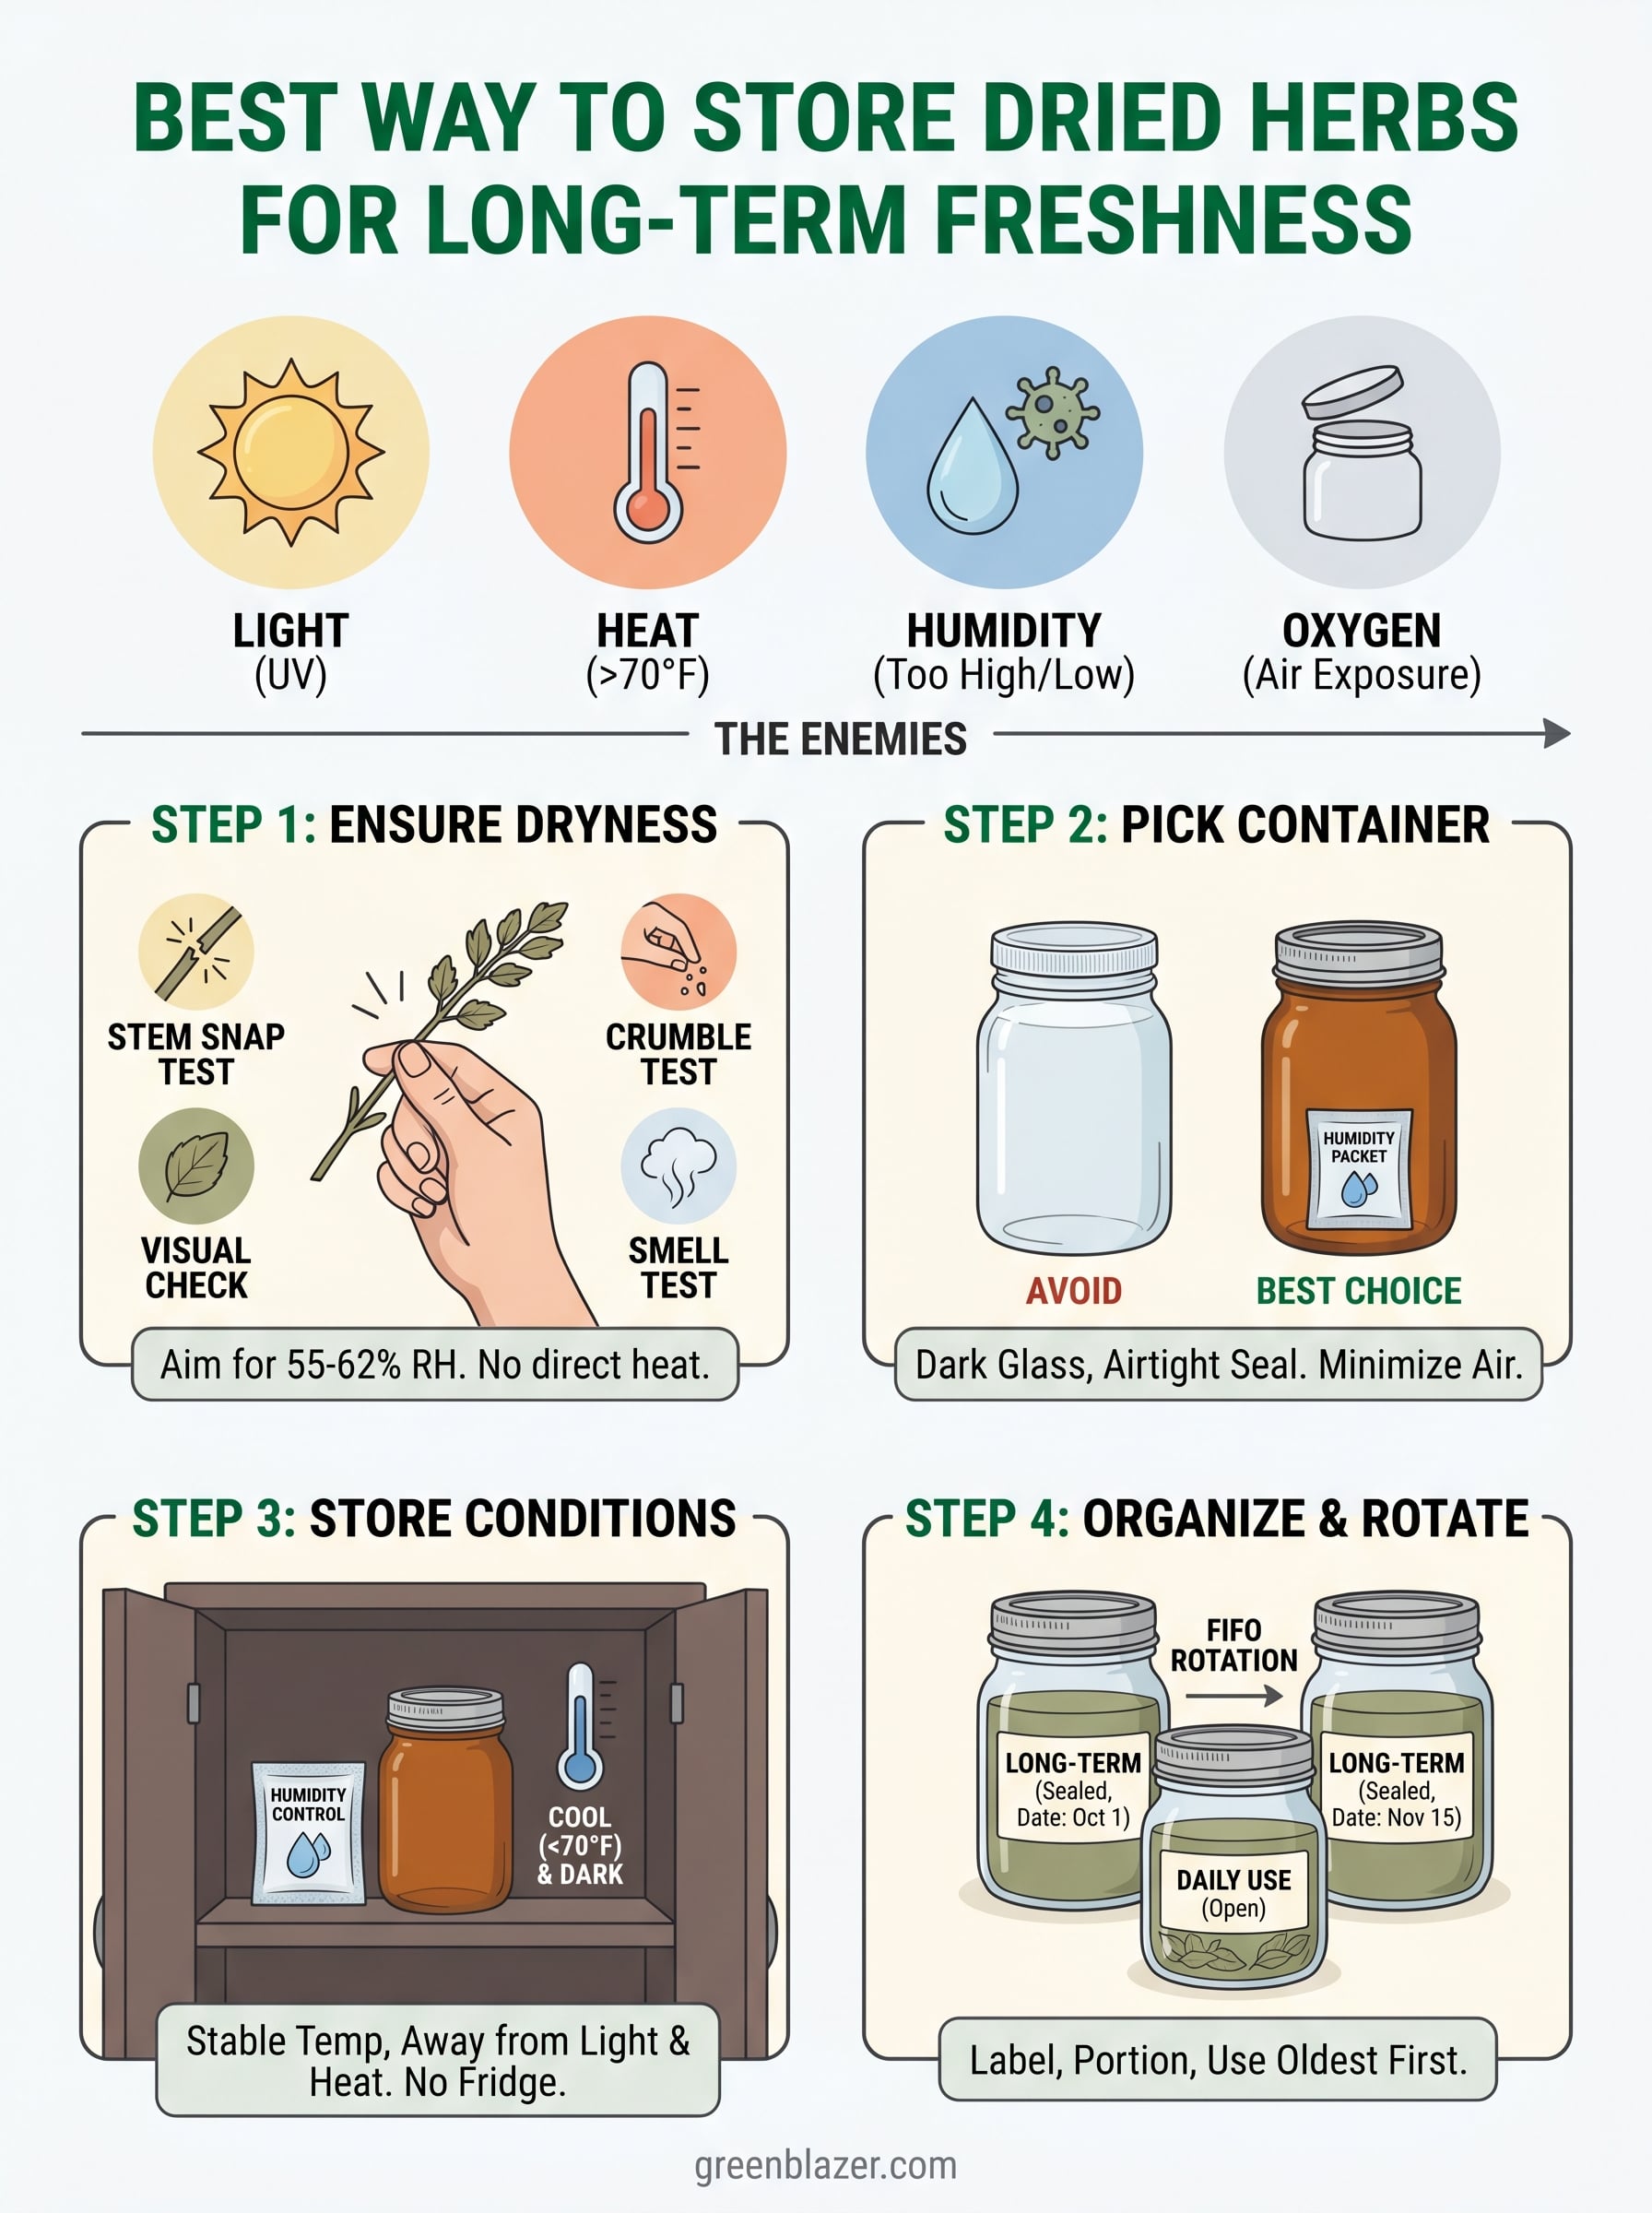
Before you can find the best way to store dried herbs, you need to understand what's actively working against you. Dried herbs don't just fade on their own. Four specific environmental factors break down the compounds responsible for their smell, taste, and effect: light, heat, humidity, and oxygen. Each attacks from a different angle, and most storage failures come from underestimating at least one of them. Getting this right starts with knowing your enemy.
Light and Heat
Light is one of the most destructive forces your herbs face after drying. UV rays break down terpenes - the aromatic compounds responsible for flavor and aroma - faster than almost any other factor. Research from the 1970s at the University of London identified light exposure as the single biggest contributor to cannabinoid degradation over time, outpacing both temperature and humidity in controlled comparisons.
Even indirect sunlight through a window can noticeably degrade herbs stored in clear containers within just a few weeks.
Heat compounds the problem by accelerating every chemical reaction happening inside your dried herbs. Terpenes evaporate faster at higher temperatures, which explains why herbs stored near a stove or heating vent lose their smell so quickly. What also causes damage is fluctuating temperatures - repeated warming and cooling causes the herb material to expand and contract, breaking down structure and inviting moisture problems. A consistent environment below 70°F (21°C) is what you're aiming for.
Humidity and Moisture
Relative humidity (RH) is a two-sided problem that catches a lot of people off guard. Too much moisture above 65% RH creates ideal conditions for mold and mildew, and you often won't notice until the herbs are already ruined. Too little humidity below 55% RH causes herbs to over-dry, making them brittle, harsh, and nearly flavorless.
The target range for most dried herbs sits between 55% and 62% RH. This window preserves terpene profiles without encouraging microbial growth. Two-way humidity control packets are a straightforward way to maintain this range passively. Here's a quick reference for what each humidity level does to your herbs:
| RH Level | Effect on Dried Herbs |
|---|---|
| Below 45% | Brittle, crumbles easily, rapid terpene loss |
| 45-54% | Over-dry, harsh smoke, diminished aroma |
| 55-62% | Ideal range, maintains flavor and structure |
| 63-65% | Risk of surface moisture, monitor closely |
| Above 65% | Mold and mildew growth likely |
Oxygen and Air Exposure
Every time you open your storage container, oxygen enters and begins oxidizing the active compounds inside your herbs. Over time, this degrades both potency and the terpene profile that drives flavor. Storing herbs in a container that's too large for the quantity makes this worse - excess air space above the herbs means a higher oxygen-to-herb ratio with every opening, speeding up the process significantly.
Airtight containers filled close to capacity slow oxidation considerably. Some commercial producers take this further by using vacuum-sealed storage for long-term batches, which removes nearly all oxygen from the environment. For everyday personal use, a well-sealed glass jar with minimal headspace handles the job without extra equipment.
Step 1. Make sure your herbs are truly dry
No storage method works if your herbs aren't fully dry before they go into a container. Sealing in residual moisture, even inside a premium airtight jar, creates a warm, enclosed environment where mold develops quickly. This step is the foundation of the best way to store dried herbs, and skipping it will undermine everything that follows. Getting the moisture level right before you seal anything is what separates a successful long-term supply from a ruined batch you have to throw out.
How to test for dryness
You don't need specialized equipment to check if your herbs are storage-ready. A few quick physical tests tell you exactly where things stand before you commit to sealing anything. Run through this checklist before closing any container:
- Stem snap test: Bend a small stem between your fingers. A properly dried stem snaps clean. If it bends without breaking, moisture is still present inside the material.
- Crumble test: Take a small pinch and gently compress it. Dry herbs crumble slightly but hold some structure. A soft, spongy, or tacky feel means they need more time.
- Visual check: Look for surface shine, visible condensation, or uneven coloration. Properly dried herbs have a consistent, matte finish throughout.
- Smell test: A strong, clean aroma is a good sign. Any musty or off smell at this stage means moisture is already causing problems before storage even begins.
If even one test fails, give your herbs more drying time before you seal them. Trapping residual moisture is the most common cause of mold during long-term storage.
What to do if your herbs need more time
Avoid the temptation to use direct heat to speed up the process. High temperatures drive off moisture fast but strip the terpenes and volatile compounds you're working to preserve. Instead, spread your herbs in a single layer on a clean, dry surface in a dark, well-ventilated space. A steady temperature between 60-70°F (15-21°C) with gentle airflow handles the job without damaging what makes your herbs worth storing in the first place.
Check your herbs every 12 to 24 hours using the tests above. Most batches that are close to ready need only an additional 24 to 48 hours in the right conditions to fully stabilize. Once the stems snap cleanly and the texture feels consistent from the outside to the center, you're ready to move on to choosing the right container.
Step 2. Pick the best container for the job
Once your herbs are fully dry, the container you choose becomes the first line of defense against everything covered in the previous section. Not all storage containers perform equally, and the differences matter more than most people expect. The best way to store dried herbs depends heavily on choosing a vessel that blocks light, holds an airtight seal, and doesn't interact with the herbs chemically. Get this right and everything downstream becomes easier.
Glass vs. Other Materials
Glass is the top choice for storing dried herbs, and for good reason. It's non-porous, which means it won't absorb odors or off-gas chemicals into your stored material. Plastic containers, even food-grade options, can leach trace compounds over time and create static electricity that pulls trichomes off your herbs every time you open them. Metal tins block light effectively but can impart a slight metallic smell after extended contact, especially with moisture-sensitive herbs.
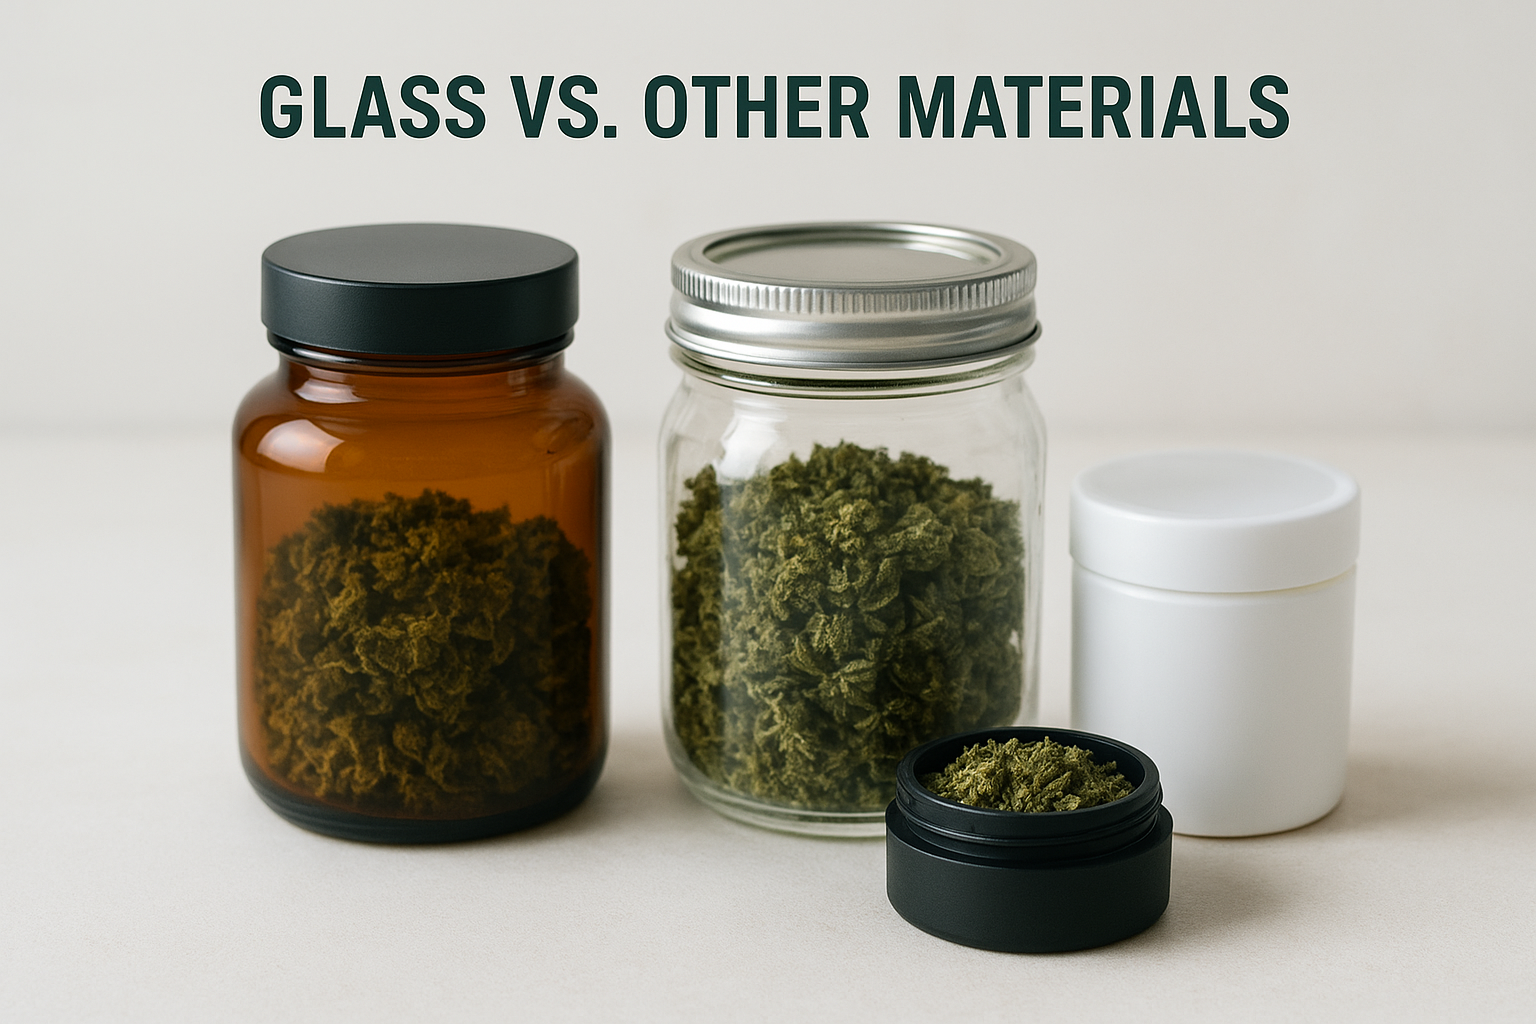
Amber or dark-colored glass jars outperform clear glass by blocking UV light at the source, so your herbs don't depend entirely on storage location for light protection.
Silicone is another option you'll see marketed for herb storage, but it works better as a short-term solution than a long-term one. Silicone is permeable over time, which means oxygen exchange can occur slowly through the walls. For anything you plan to store beyond a few weeks, stick with glass.
What Size and Seal to Look For
Container size directly affects how much air your herbs sit with between uses. A half-full jar doubles the oxygen exposure compared to one packed close to capacity. Match your container size to your actual supply so you're filling it to roughly 80-90% full at minimum.
On the seal, mason jars with two-part metal lids create a reliable airtight environment at low cost. Wide-mouth designs make it easier to pack and retrieve herbs without crushing them against the container walls. For commercial producers managing larger bulk quantities, vacuum-sealed glass jars or UV-blocking dispensary-style containers add another layer of protection worth the investment. Whatever you choose, test the seal by pressing the lid after closing - any flex or give means air is getting in and your herbs won't stay fresh as long as they should.
Step 3. Store them in the right conditions
You've chosen the right container, but where you put it and what surrounds it determines how long your herbs actually hold up. Temperature, light, and humidity are the three variables you're managing at this stage, and the best way to store dried herbs requires getting all three right at the same time, not just one or two. A dark glass jar sitting next to a heating vent is still a bad storage setup, and the jar alone won't save it.
Temperature and Light Control
Keep your storage location consistently below 70°F (21°C) and away from any direct or indirect light source. Kitchen cabinets near the stove or oven are a common default that often backfires because the ambient heat from cooking raises the local temperature enough to drive off terpenes over time. A dedicated shelf in a closet, a basement cabinet, or a drawer in a room-temperature area gives you the stable, dark environment your herbs need to hold their profile long-term.
An interior closet away from exterior walls stays cooler and more consistent year-round than any spot near a window or appliance, making it one of the best passive storage locations in most homes.
Avoid the refrigerator for most dried herbs. Refrigerators cycle through humidity fluctuations each time you open the door, and condensation forms on cold surfaces when warm air makes contact with them. That kind of repeated temperature and moisture swing encourages mold rather than preventing it, which defeats the purpose of careful storage.
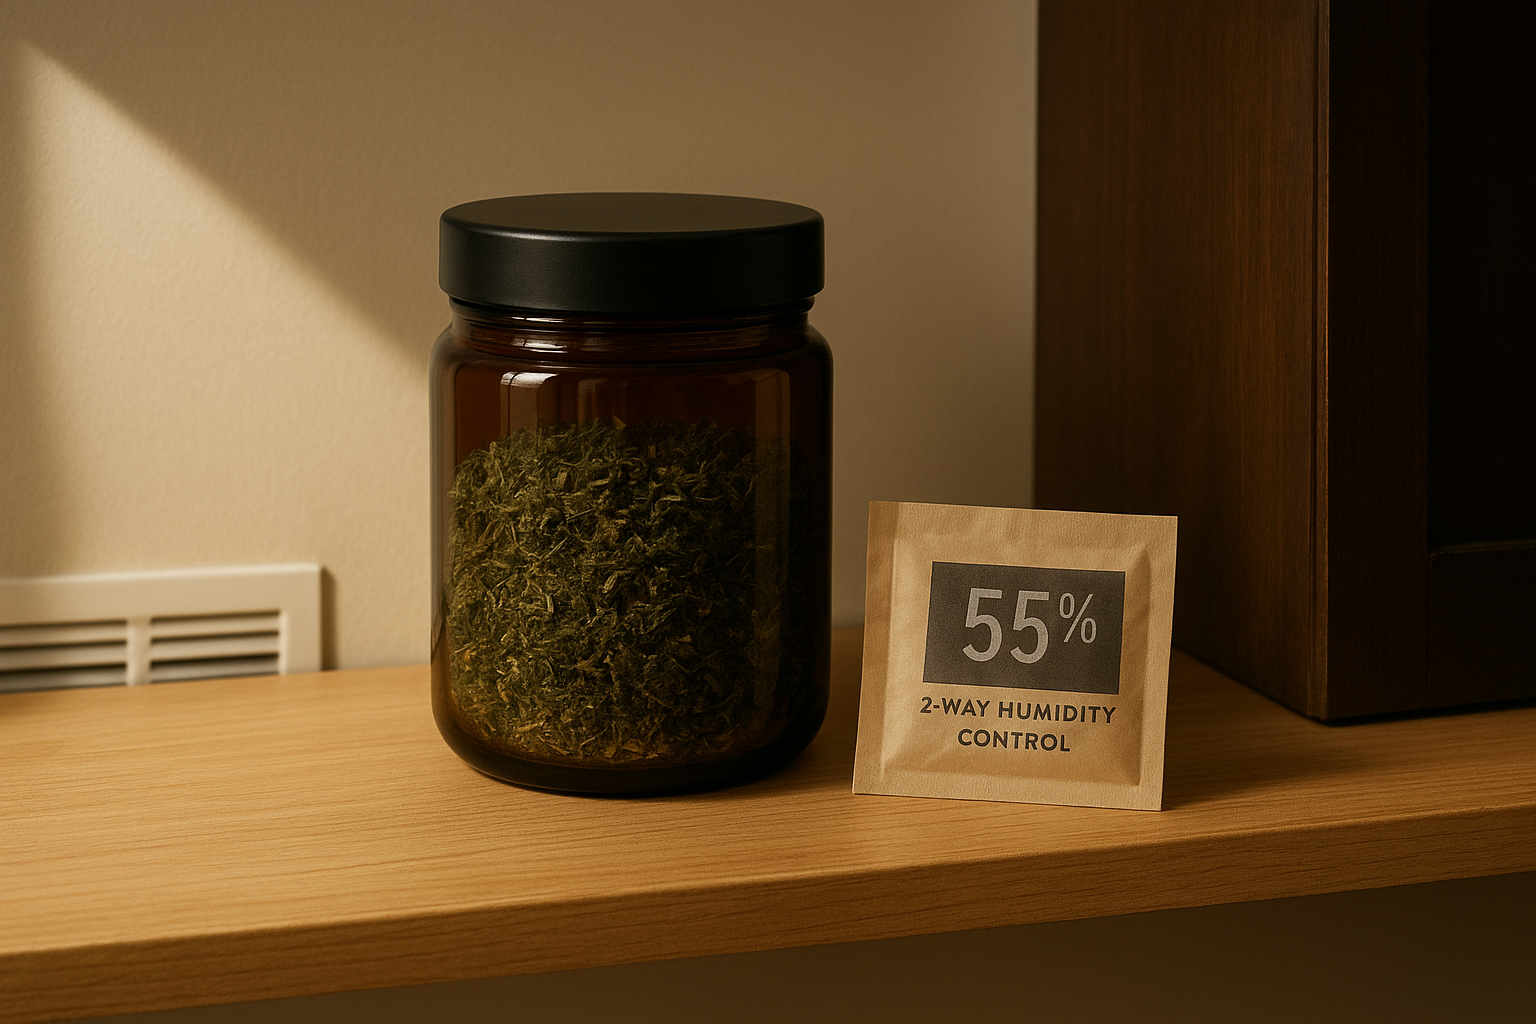
Humidity Management
Even inside a well-sealed container, humidity can drift outside the 55-62% RH target range depending on how often you open the jar and the ambient conditions in your storage area. Two-way humidity control packets solve this passively without any active monitoring. Brands like Boveda and Integra Boost make pre-calibrated packets sized for different container volumes - a 4-gram packet handles a standard mason jar, while an 8-gram packet suits larger containers.
Drop one packet inside your sealed jar when you load it up. Replace the packet every three to six months, or sooner if it feels completely rigid, which means it has fully absorbed as much as it can and is no longer regulating the environment. For commercial producers managing bulk inventory, pairing humidity packets with a standalone hygrometer in your storage area lets you catch any problem containers before the contents are compromised.
Step 4. Label, portion, and rotate your supply
Even with the right container and ideal storage conditions, a disorganized supply creates its own problems. Unlabeled jars make it impossible to track how long something has been stored, and pulling from your freshest batch while older herb sits forgotten at the back of a shelf defeats the purpose of long-term storage entirely. The best way to store dried herbs goes beyond the physical environment. Managing what you have in a systematic way prevents waste and keeps every session predictable, whether you're a casual user or a commercial producer running through volume regularly.
Label Every Container Before You Seal It
A good label takes thirty seconds and saves a lot of guesswork down the line. At minimum, write the herb variety and the date you sealed the container. If you're using humidity packets, add the replacement date directly on the label so you don't have to track it separately. Use masking tape and a permanent marker on glass jars, or print adhesive labels if you're managing a larger commercial inventory.
Here's a simple label template you can apply to every jar:
Herb:               _______________
Sealed:             _______________
Packet Replace By:  _______________
Notes:              _______________
Noting dry time, source, or any other relevant batch detail on the label gives you useful context the next time you reorder or troubleshoot a session.
Portion Into Smaller Jars
Every time you open a jar, you introduce fresh oxygen and disrupt the humidity balance you've worked to maintain. Dividing a larger quantity into multiple smaller jars fixes this directly. Keep one smaller jar accessible for active use and leave the rest sealed. This limits how often your long-term supply gets disturbed, which extends freshness noticeably across weeks and months.
For example, if you have 28 grams to store, split it into a 7-gram jar for daily access and seal the remaining 21 grams across two separate jars. Those sealed jars stay untouched until you actually need them.
Rotate Using First-In, First-Out
First-in, first-out rotation means you always use the oldest sealed batch before opening anything newer. When fresh supply comes in, place the new jars at the back of your shelf and move existing stock to the front. This keeps older material from sitting forgotten while newer inventory gets used first, which is the most common way a well-stored supply ends up going to waste.
Keep dried herbs fresh for the long haul
The best way to store dried herbs comes down to a simple system applied consistently: fully dry herbs, the right container, stable conditions, and organized rotation. None of these steps requires expensive equipment or complicated setups. A dark glass jar, a humidity packet, and a permanent marker get you most of the way there on their own.
What separates a smooth, flavorful session from a harsh, flat one is often just how the herbs were handled between purchase and use. Every variable you control - light, heat, humidity, oxygen - compounds over time. Get all four right and your herbs stay true to their original character for months, not days. Skip one and the others can't compensate.
Start with one small jar and build the habit before scaling up. Once proper storage becomes automatic, you'll never go back. For everything you need to complete the perfect session, shop RAW cones and accessories at Green Blazer.