

A sticky, gunked-up grinder kills the whole experience. If you're wondering how to clean a metal grinder, chances are yours is already struggling, teeth clogged with resin, chambers stuck together, and herbs grinding unevenly. That buildup doesn't just make your grinder harder to twist. It actually affects the quality of your grind, which means uneven packing, wasted material, and a worse smoke.
The good news: you can fix this at home in under 30 minutes with stuff you probably already have. No special tools required, no trips to the store. Whether your grinder is mildly dusty or borderline cemented shut, this guide covers methods that work for every level of buildup, from quick maintenance cleans to deep resin removal.
At Green Blazer, we sell RAW smoking accessories alongside our cones and papers because every piece of your setup matters. A clean grinder paired with a quality pre-rolled cone gives you the smooth, even burn you're after. Here's exactly how to get your grinder back to like-new condition, step by step.
Why clean your metal grinder and what you need
A metal grinder collects resin fast. Sticky residue from herbs bonds to the teeth, packs into the threading, coats the kief screen, and gradually turns every chamber into a gummed-up mess. That isn't just an aesthetic problem. A coated screen stops kief from falling through, clogged teeth grind unevenly, and threads covered in resin grind against each other every time you twist the lid. The longer you wait between cleans, the harder the job gets.
What happens when you skip cleaning
Skipping regular maintenance costs you more than a little annoyance. Uneven grinding produces inconsistent material, which means irregular packing in your cones and an uneven burn from start to finish. A screen that's caked over traps your kief completely, so you lose the most concentrated part of your herb without even knowing it. Beyond the quality issues, resin and grit act like a mild abrasive against your grinder's metal threads every time you open and close the chamber. That constant friction wears the threading down faster than normal use would on its own.
A grinder you clean every two to four weeks stays sharp, smooth-twisting, and free of the kind of compacted buildup that takes serious effort to remove.
Resin that's been sitting for weeks or months also becomes much harder to dislodge. What takes five minutes of soaking on a monthly basis can take 30 to 45 minutes of scrubbing once buildup hardens. Regular cleaning saves time overall and keeps every session running smoothly without the frustration of a stuck lid or a grind that takes twice the effort.
What you need before you start
Before you work through how to clean a metal grinder step by step, pull your supplies together first. Having everything ready before you disassemble means you won't be hunting around with sticky hands mid-process. Most of what you need costs very little and is probably already in your home.
Here's the full supply list:
| Item | Purpose |
|---|---|
| Isopropyl alcohol (91% or higher) | Primary cleaning agent to dissolve resin |
| Zip-lock bag or small container | Holds pieces during the soak |
| Stiff toothbrush or small cleaning brush | Scrubs teeth, chamber walls, and threading |
| Toothpick or dental pick | Clears resin from screen holes and tight corners |
| Paper towels or clean cloth | Dries pieces after rinsing |
| Coin or flat tool | Pries apart chambers stuck with resin |
| Plate or tray | Catches loose kief during disassembly |
On alcohol concentration: the standard 70% isopropyl sold in first-aid kits works, but it contains more water than you want for this job. Higher water content slows resin breakdown and adds drying time at the end. If your pharmacy or grocery store carries 91% or 99% isopropyl, that's the better choice. It dissolves resin faster, evaporates more completely, and gets your grinder dry and ready to use again in less time.
One thing to avoid at this stage: don't use rubbing alcohol that includes additives like fragrance or aloe vera. Those leave residue behind, which defeats the point of cleaning entirely. Plain isopropyl alcohol with no additives is all you need.
Step 1. Clear it out and take it apart
Before you soak anything, empty your grinder completely and break it down into individual pieces. Skipping this step means cleaning around trapped material, which wastes your cleaning solution and leaves residue behind. Taking two minutes to clear and separate everything now saves you from doing the job twice.
Empty each chamber before you open anything
Place a clean plate or tray underneath your grinder before you twist anything open. Kief and loose herb fall fast, and you want to catch every bit of it. Tap the grinder firmly against the tray a few times while it's still assembled. Loose material shakes free from the teeth and chamber walls, making disassembly cleaner and giving you a chance to save any kief that's already collected.
Don't throw away what falls out. That loose kief is the most potent part of your herb, and it's worth setting aside before the cleaning process starts.
Use a toothpick or dental pick to work any compacted material out of the teeth before you open the lid. Pulling packed herb out now means less gunk to deal with during the soak, and you won't be washing usable material down the drain with your cleaning solution.
Take the grinder apart in the right order
Start from the top chamber and work down. Twist the lid off first, then separate the grinding chamber from the kief chamber. If your grinder has a screen layer between those two chambers, remove that piece separately. Keeping track of the order matters when it's time to reassemble.
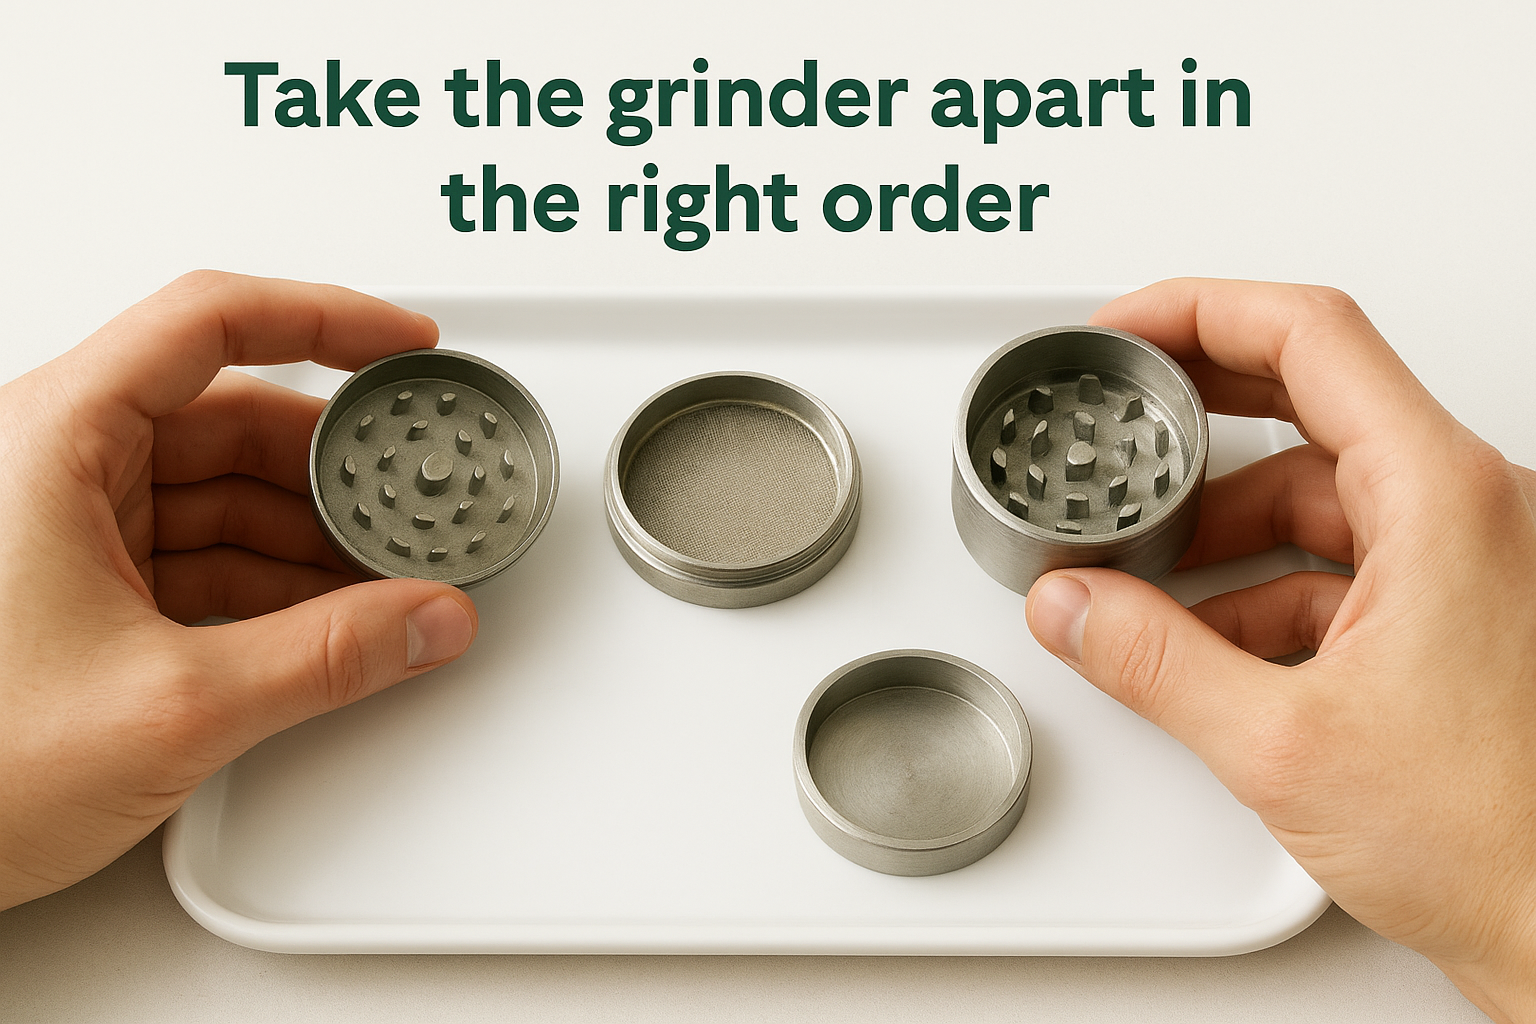
If chambers feel stuck from resin buildup, don't force them with a hard twist. Place the grinder in the freezer for 15 to 20 minutes first. Cold temperatures make resin brittle, which breaks the sticky seal between chambers without stressing the threading. Once you pull it out, the sections should separate with a firm but controlled grip.
Lay every piece flat on your tray in the order you removed them: lid, top grinding chamber, screen, kief catcher. This simple setup makes the rest of how to clean a metal grinder go faster because nothing gets misplaced mid-process.
Step 2. Break up resin before you soak
Jumping straight into a soak without loosening the resin first wastes your cleaning solution and leaves the hardest deposits stuck to the metal. Resin that's been sitting for weeks forms a semi-solid layer that alcohol needs time to penetrate. Spending a few minutes breaking it up mechanically before the soak means the alcohol gets to work on a thin remaining film instead of fighting through a thick crust, and the whole process finishes faster.
Freeze the pieces first
Cold temperatures are one of the most underused tools in how to clean a metal grinder. Placing your disassembled grinder pieces in the freezer for 20 to 30 minutes makes sticky resin brittle, so it snaps and flakes off instead of stretching and smearing when you try to remove it.
This single step cuts your scrubbing time significantly, especially if your grinder hasn't been cleaned in months.
After pulling the pieces out of the freezer, tap each piece firmly against a folded paper towel or the edge of your tray. Frozen resin breaks away in small flakes, and much of the buildup drops off without any tools at all. Work quickly before the pieces warm back up and the resin softens again.
Scrape the remaining buildup
Once you've knocked off the loose frozen resin, move in with a toothpick or dental pick to clear what's left. Focus on three areas that collect the most buildup:
- Teeth and between the teeth: drag the pick along the base of each tooth in a single, firm stroke
- Threading on the lid and chambers: run the pick through the grooves in a circular motion to pull resin out of the channel
- Kief screen holes: press the pick straight through each hole from the top side to push packed material clear
Avoid metal tools that can scratch or gouge the surface. A wooden toothpick or plastic pick gives you enough leverage to dislodge hardened resin without damaging the finish or creating rough spots that grip future buildup even faster. Once the visible chunks are gone, your grinder is ready for the soak.
Step 3. Soak with isopropyl alcohol the right way
With the resin loosened and the bulk of the buildup removed mechanically, the soak does the rest. Place each grinder piece into a zip-lock bag or small container and pour enough isopropyl alcohol (91% or higher) to fully submerge every part. Make sure no piece sits above the liquid line, since any exposed surface won't clean evenly. Seal the bag or put a lid on the container, give it a gentle shake to coat everything, and let it sit.
How long to soak and why it matters
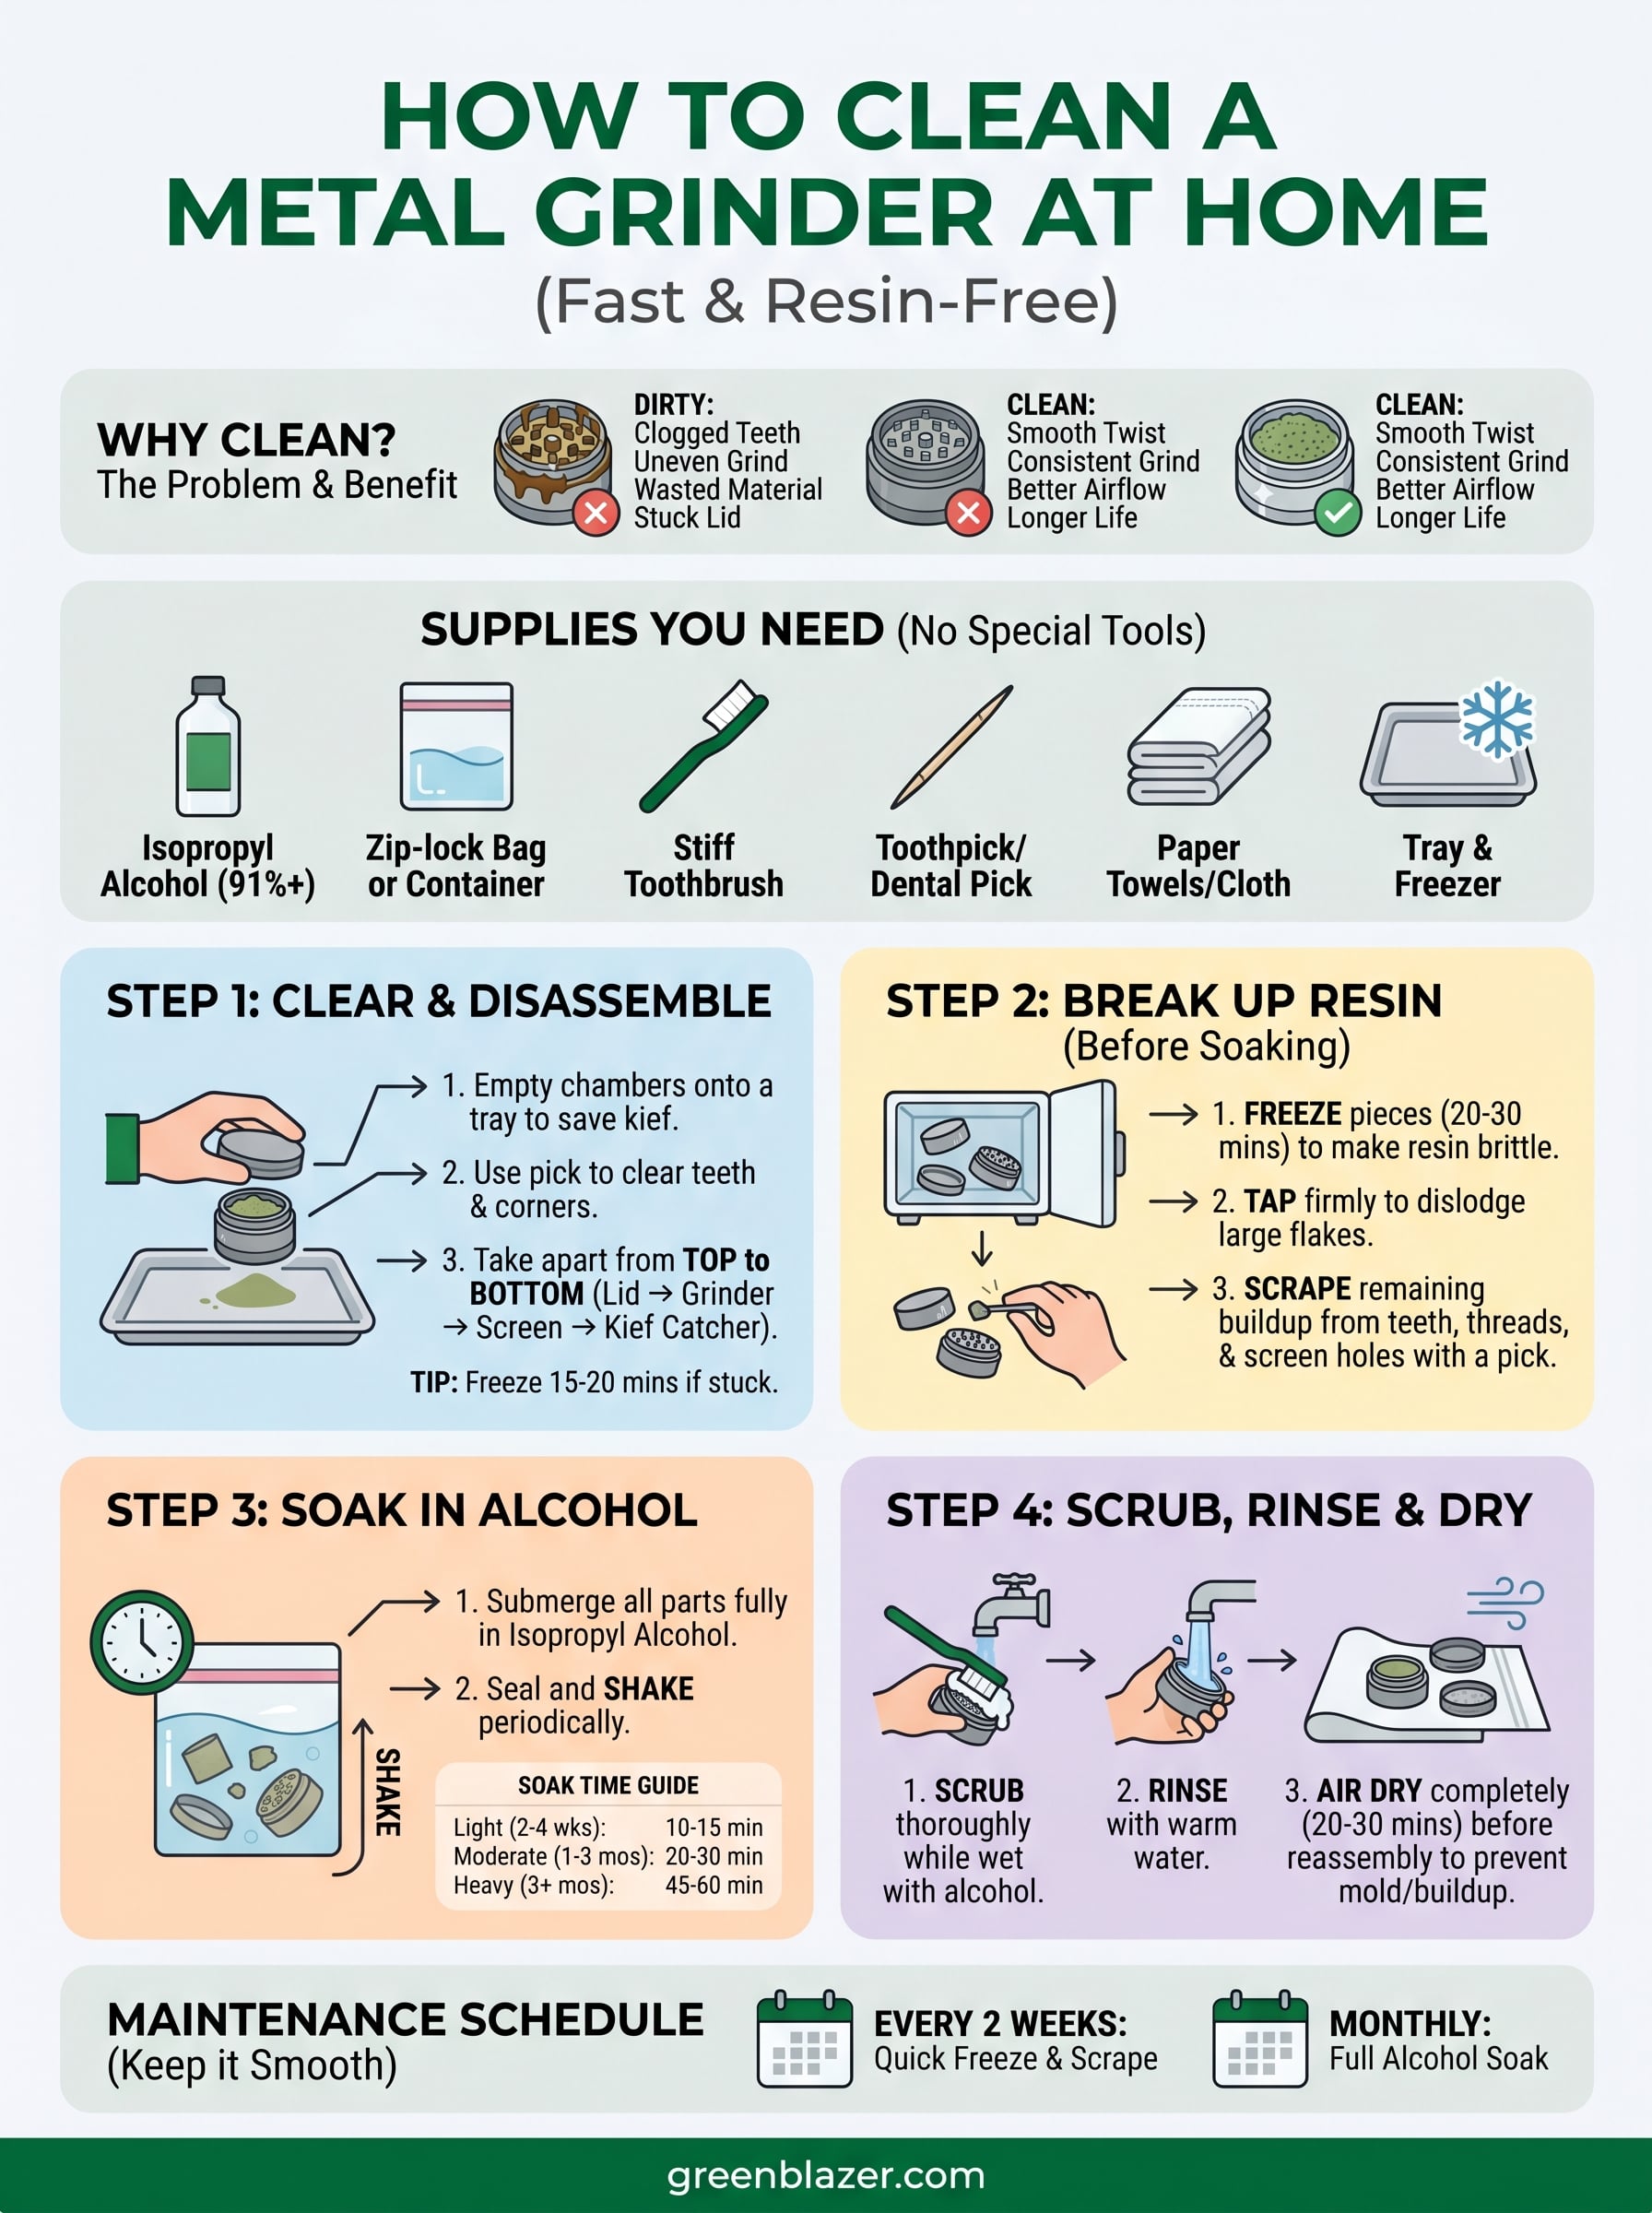
Soak time depends on how much residue remains after your mechanical scraping. Light buildup from a recently cleaned grinder needs far less time than months of compacted resin. Use this as your reference:
| Buildup level | Soak time |
|---|---|
| Light (cleaned within 4 weeks) | 10 to 15 minutes |
| Moderate (1 to 3 months since last clean) | 20 to 30 minutes |
| Heavy (longer than 3 months, or never cleaned) | 45 to 60 minutes |
If you're learning how to clean a metal grinder for the first time and your grinder is visibly gunked up, start with a full 60-minute soak before you scrub.
Resist the urge to cut the soak short when you're dealing with heavy buildup. Alcohol needs direct contact time to fully dissolve the resin compounds bonded to the metal. Pulling pieces out too early means scrubbing much harder during the next step.
What to do while the pieces soak
You don't need to watch the container, but shaking it every 10 to 15 minutes helps. A gentle agitation moves fresh alcohol across the metal surface and pushes loosened resin off the teeth and threading instead of letting it settle back down. Pick up the bag or container, give it 10 to 15 firm shakes, and set it back down.
Check the color of the alcohol partway through. Dark brown or orange liquid means the soak is actively pulling resin out, which is exactly what you want. If your soak time ends and the liquid looks nearly black, pour it out, add fresh alcohol, and soak for another 15 minutes before moving on.
Step 4. Scrub, rinse, and dry it fully
Pull each piece out of the soak one at a time and start scrubbing immediately while the alcohol is still wet on the surface. The dissolved resin wipes away much more easily while it's suspended in the liquid than it does once the alcohol evaporates. Work over a tray or sink so you have a clean surface to rest each piece on as you finish it.
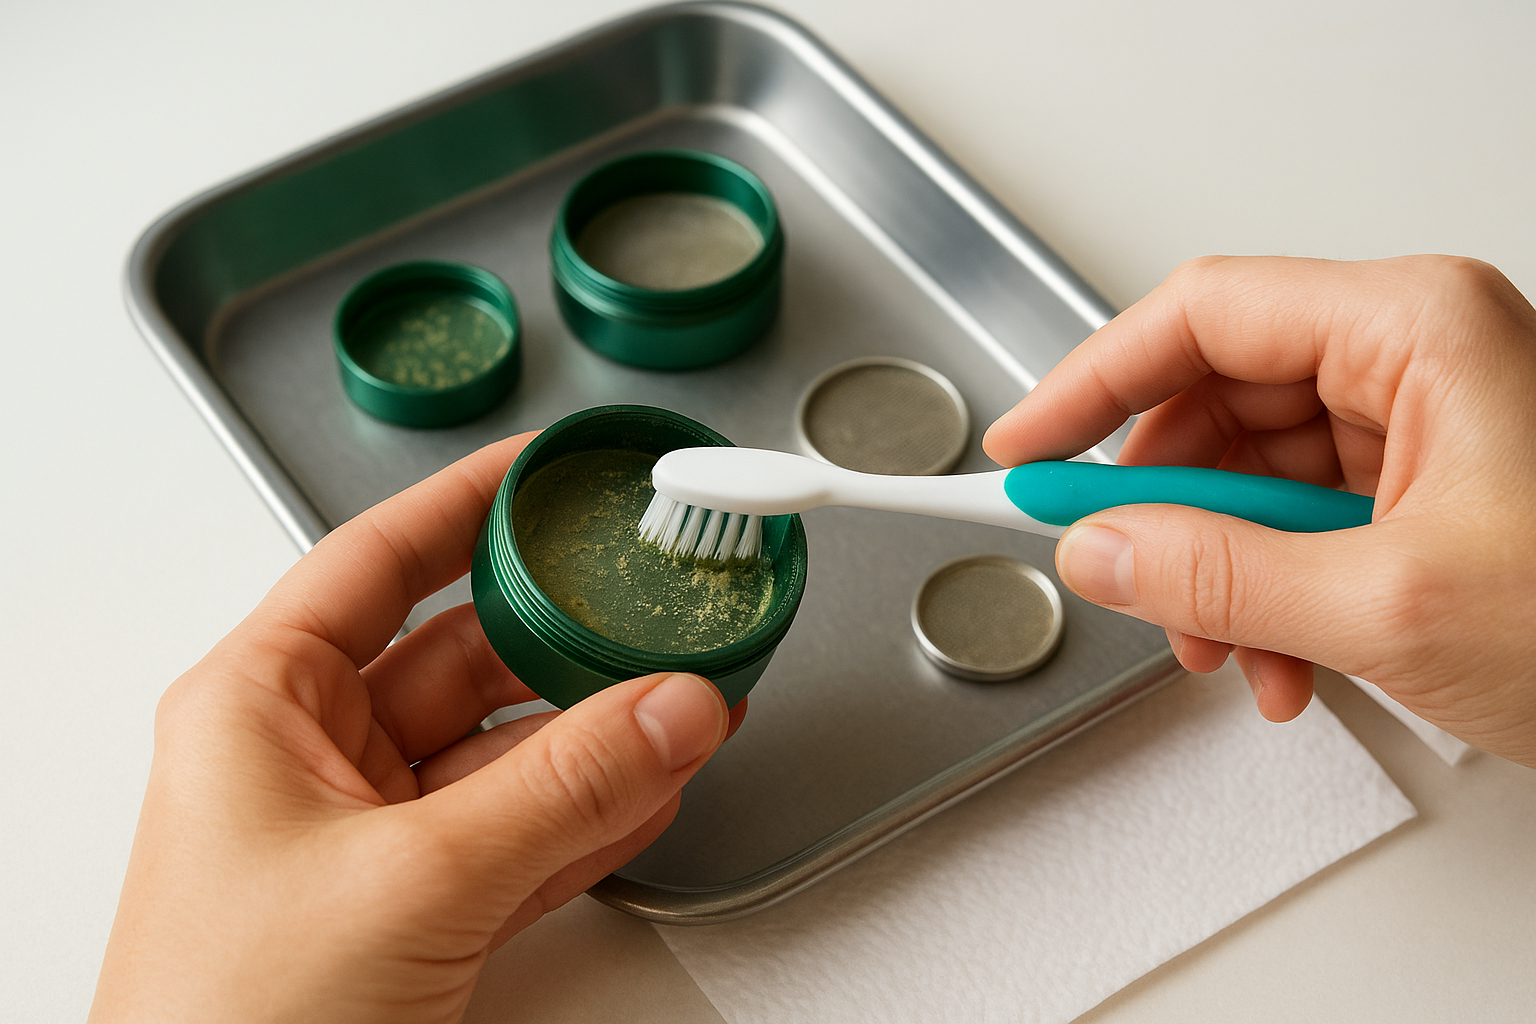
Scrub each piece thoroughly
Your stiff toothbrush is the right tool here, and the technique matters as much as the effort. Use short, firm strokes rather than long sweeping passes. Short strokes give you more pressure per inch of surface area, which clears residue from between the teeth and out of the threading far more effectively than scrubbing back and forth in wide arcs. Hold each piece under a small amount of fresh isopropyl alcohol as you scrub so loosened resin washes away instead of redepositing on a nearby surface.
Work through each piece in a consistent order so nothing gets missed:
- Lid: scrub the inner face and the threading groove all the way around
- Top grinding chamber: work the teeth from base to tip, and clean the threading on both the top and bottom edges
- Screen: use the toothpick to press through any remaining blocked holes, then brush both sides lightly
- Kief catcher: scrub the inner walls and the rim where it contacts the screen layer
Pay extra attention to the threading on every piece. That's where resin hardens fastest and causes the most resistance when you twist.
Rinse and dry completely
Once you finish scrubbing, rinse every piece under warm running water to remove any remaining alcohol and loosened residue. Shake each piece to clear water from inside the chambers, then lay everything flat on a clean paper towel or dry cloth.
Drying fully before reassembly is the most skipped part of how to clean a metal grinder, and it matters. Any moisture trapped between the chambers or on the screen creates a damp environment that speeds up future buildup and can affect the taste of your next grind. Give the pieces at least 20 to 30 minutes of air drying, or set them in a warm spot to speed the process. Reassemble only when every surface feels completely dry to the touch.
Alcohol-free options and what to avoid
Isopropyl alcohol is the fastest and most effective method, but it's not the only option. If you don't have any on hand or prefer to skip it, a few alternatives work reasonably well depending on how much buildup you're dealing with. Knowing what actually helps and what causes damage saves your grinder from unnecessary wear before you start.
Alternatives that work without alcohol
Boiling water is the most accessible alcohol-free method. Place your disassembled metal grinder pieces in a pot, cover them completely with water, and bring it to a gentle boil for 10 minutes. The heat softens and loosens resin, and the bubbling water carries it away from the teeth and threading. Pull each piece out with tongs, let everything cool down completely before you handle it, then scrub with your toothbrush and rinse clean.
Freezing without soaking works as a standalone option for light maintenance. If your grinder hasn't gone more than a few weeks without a clean, running through the freeze-and-scrape steps covered earlier may restore smooth operation without any liquid at all. This method won't clear deep resin deposits, but it handles recent accumulation quickly.
For a deeper clean, boiling water gets closer to alcohol-level results than any other alcohol-free option available at home.
What to avoid entirely
Some cleaning approaches that appear in online guides cause real damage to your grinder. Acetone-based nail polish remover dissolves resin quickly, but it also strips protective coatings off the metal and leaves chemical residue behind that you don't want anywhere near material you're going to smoke. Keep it away from every part of your grinder.
Dish soap and water alone won't cut through hardened resin regardless of how long you scrub. Soap breaks down water-soluble residue effectively, but cannabis resin is oil-based, and standard dish soap doesn't dissolve oils well enough to give you a genuinely clean result. Beyond soap, avoid anything abrasive: steel wool, rough scouring pads, or metal scrapers scratch the interior surface and teeth of your grinder. Those scratches create texture that resin grips onto during your next session, which makes how to clean a metal grinder a harder job every single time you repeat the process.
Keep it smooth for next time
Now you know exactly how to clean a metal grinder from start to finish. The real key to keeping it that way is building a simple maintenance schedule before buildup has a chance to harden. Run through the freeze-and-scrape steps every two weeks, and do a full isopropyl alcohol soak once a month. That rhythm takes less than 15 minutes per session and prevents the kind of compacted resin that turns a quick clean into a 45-minute project.
Your grinder works best as part of a setup where every component pulls its weight. A clean, sharp grinder produces a consistent grind, and a consistent grind packs better into a quality cone. If you're still rolling by hand or using cones that run and canoe, that's the next thing worth fixing. Check out the full lineup of RAW pre-rolled cones at Green Blazer and see what a better cone does for your sessions.