

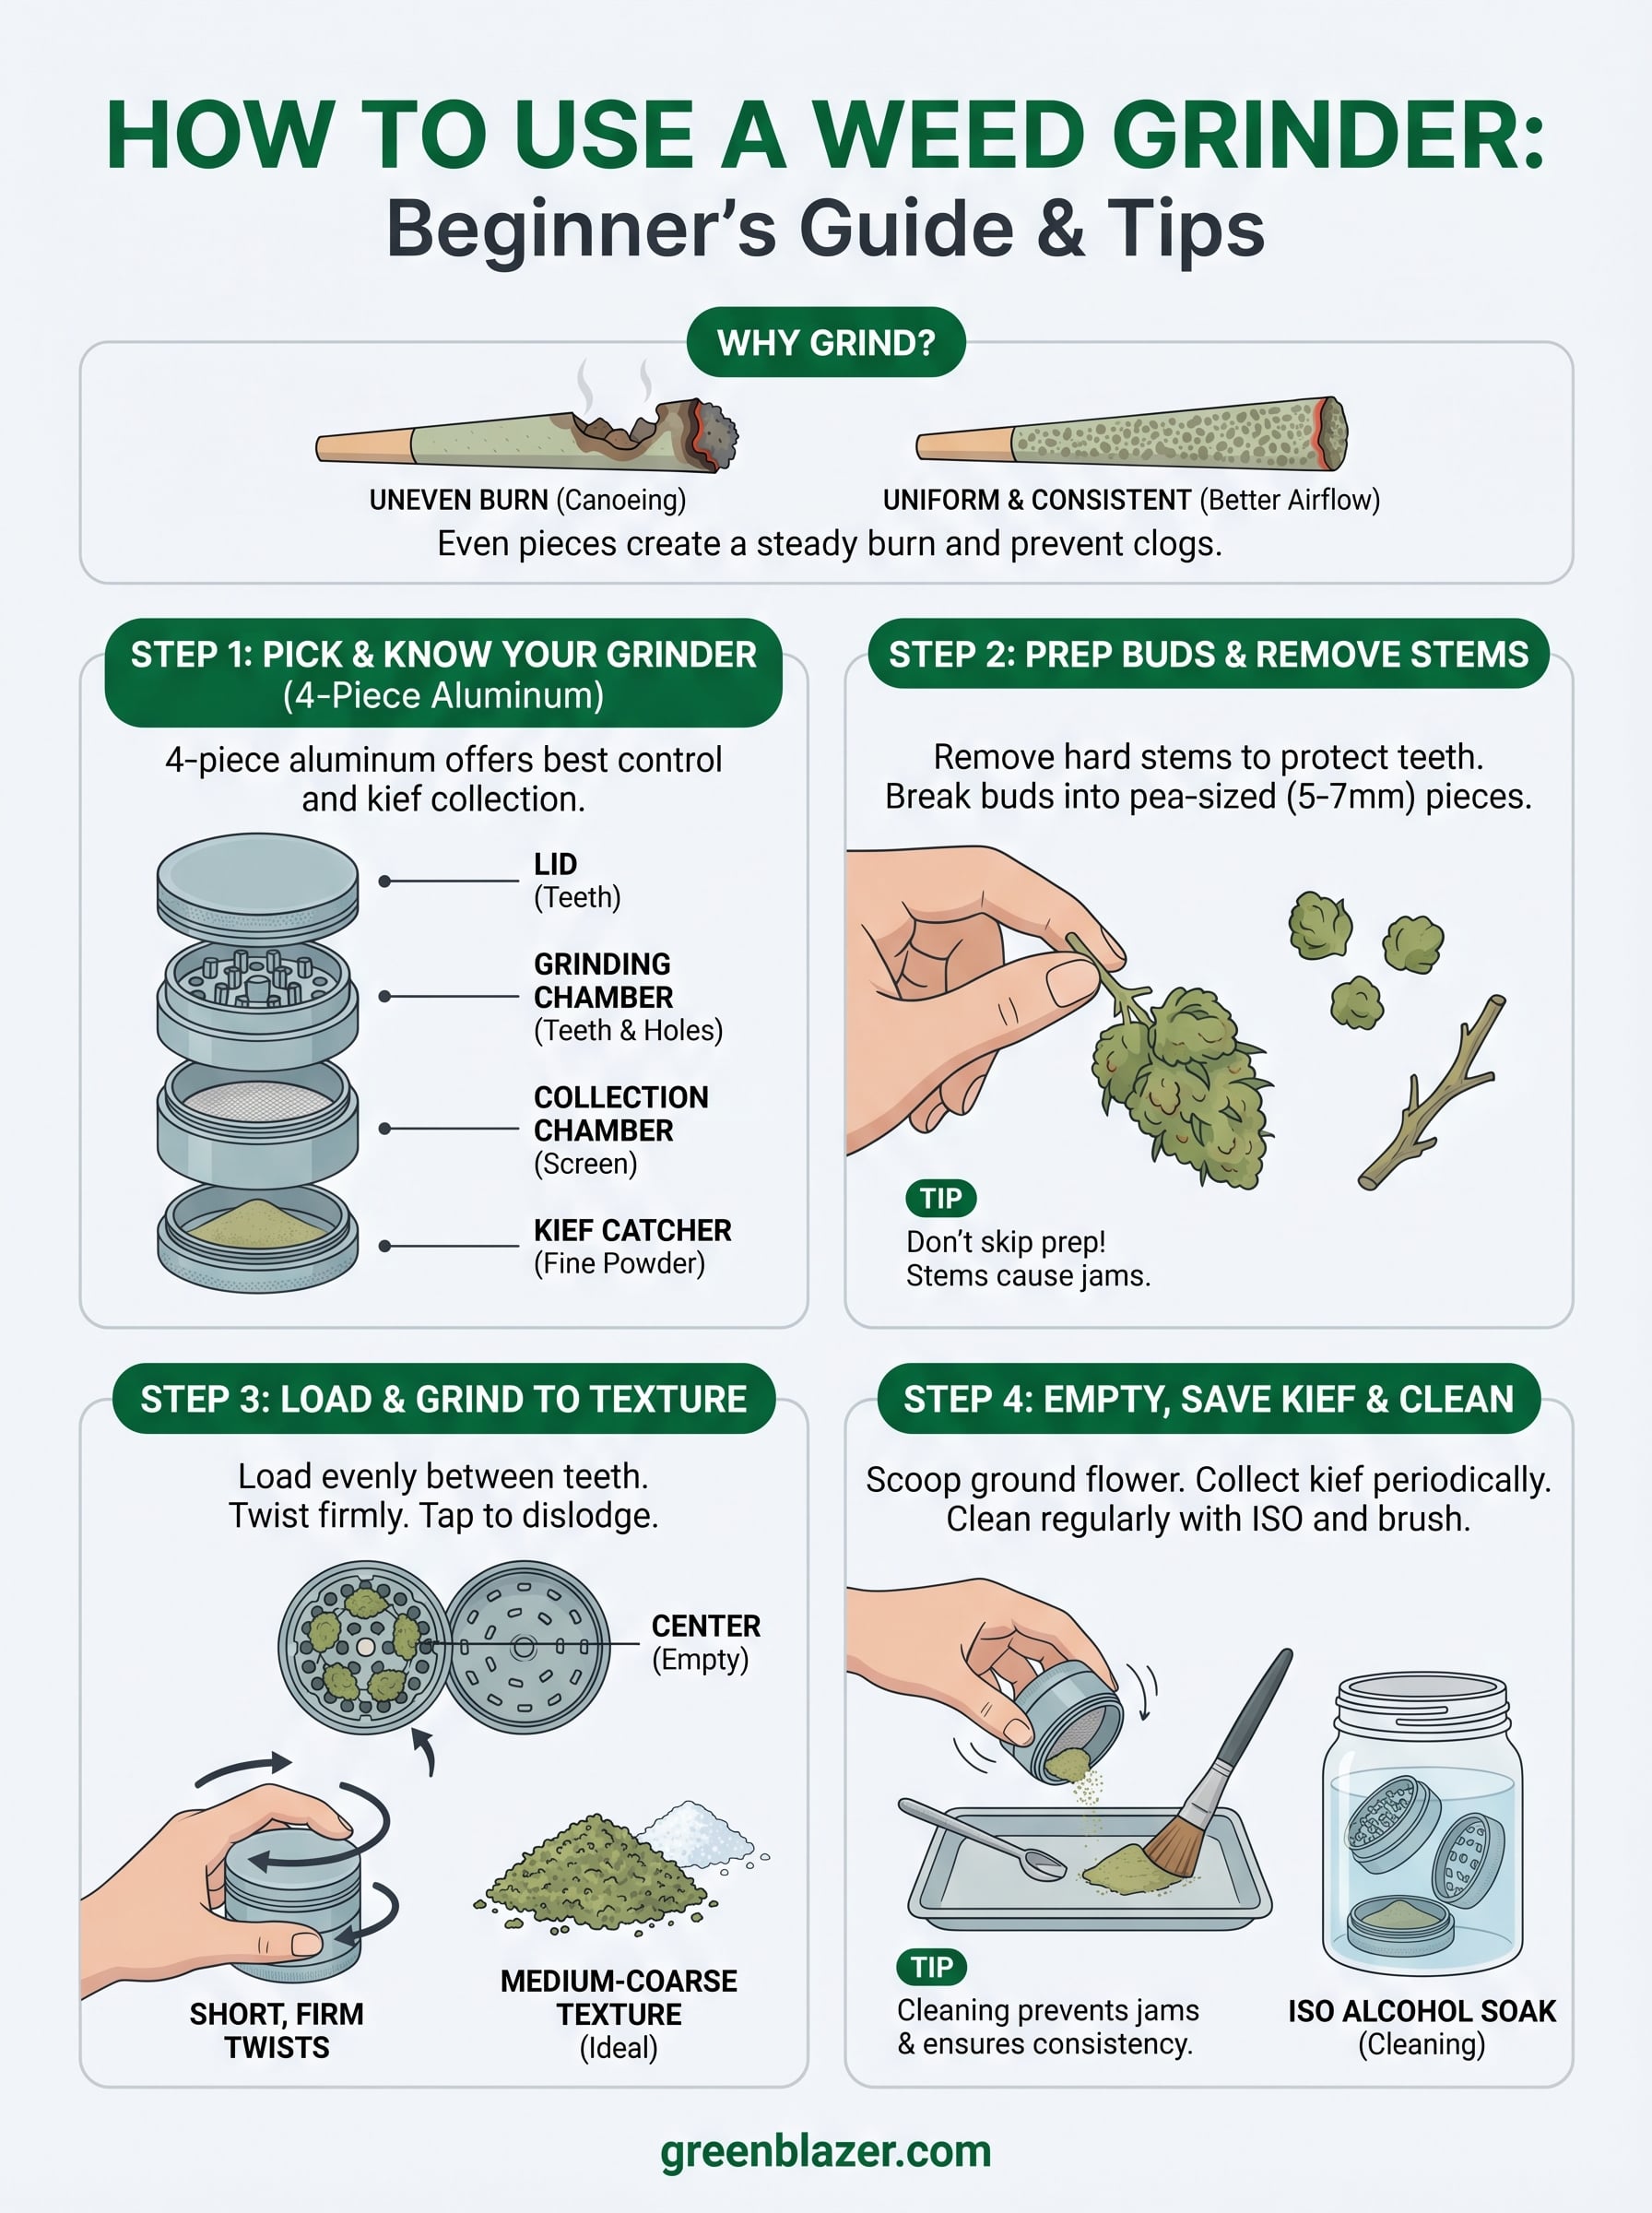
A good grind makes or breaks your smoking session. Whether you're packing a bowl or filling a pre-rolled cone, the consistency of your flower matters, and that starts with knowing how to use a weed grinder properly. Too coarse, and you get uneven airflow. Too fine, and you risk a clogged draw. Getting it right is simple once you understand the basics of how these devices work.
If you've never touched a grinder before, don't overthink it. The process takes about 30 seconds once you get the hang of it, and the payoff is a smoother, more even burn every time. For anyone who fills RAW cones, which is what we do best here at Green Blazer as the largest authorized RAW cone retailer in the U.S., a quality grind is step one.
This guide walks you through everything: choosing the right grinder, loading it, grinding technique, collecting kief, and keeping your grinder clean for the long haul. Each step includes practical tips pulled from real experience, so you'll go from unboxing to grinding with confidence in just a few minutes.
What a weed grinder does and why it matters
A grinder takes whole cannabis buds and breaks them down into smaller, uniform pieces that burn more evenly and pack more consistently. Without one, you're left tearing flower apart by hand, which produces uneven chunks that burn at different rates, waste material, and turn filling cones or packing bowls into a frustrating process. A grinder solves all of that in under a minute, and once you use one, going back feels pointless.
How a grinder actually works
Most grinders consist of two or more interlocking chambers. The top two pieces hold sharp teeth that face each other. When you twist the lid back and forth, those teeth shear through the flower and push the ground material through small holes into a collection chamber below. Multi-chamber grinders add a fine screen below that collection chamber to catch kief, which is the powdery, potent material that separates from dried cannabis as it breaks down.
The process is purely mechanical. You place the bud between the teeth, close the lid, and rotate it. Gravity and the screen size determine how fine the final texture is. Most standard grinders land in the medium-coarse range, which works for the majority of use cases including pre-rolled cones, bowls, and loose-leaf rolls.
A four-piece grinder (lid, grinding chamber, collection chamber, kief catcher) gives you the most control and the best value from every gram you grind.
Why grind consistency matters more than you think
The texture of your ground flower directly affects airflow and burn rate. Pack a cone with uneven chunks, and the burn moves faster on one side than the other, a problem commonly called canoeing. Pack one with material that is ground too fine, and the cone clogs and the draw becomes difficult. A consistent, medium-coarse grind keeps airflow steady from start to finish.
For anyone filling RAW cones, this is not a minor detail. RAW cones are designed with a specific draw resistance in mind. The cone shape and the gum line placement work together to create a slow, controlled burn. When you fill them with properly ground material, you get exactly what RAW engineered. When you fill them with hand-torn chunks, you introduce variables that work against the design and waste the quality of the product.
The difference between hand-breaking and grinding
Hand-breaking flower is common among beginners, but it has real drawbacks beyond just texture. Your fingers compress the trichomes, which are the resinous structures that carry most of the plant's potency, and those trichomes stick to your skin instead of making it into your cone or bowl. You also lose the small particles that fall off during the process, and those add up over time.
Grinding preserves more of that material. The closed chamber keeps everything contained, so nothing escapes onto your rolling tray or fingers. The screen in a four-piece grinder captures kief instead of letting it disappear, and over a few weeks of regular use, that kief accumulates into a meaningful amount. Many experienced users add a light dusting of collected kief to their sessions for a noticeable difference without buying extra product.
Understanding what a grinder actually does and why consistency and containment matter is the foundation for everything else in this guide. Knowing how to use a weed grinder well starts with respecting what it is designed to do.
Step 1. Pick a grinder and know the parts
Before you learn how to use a weed grinder, you need the right one in your hand. Grinders come in several formats, and picking the wrong type means either losing kief or fighting a device that doesn't suit your routine. The most common materials are aluminum and acrylic, with aluminum being the clear choice for durability. Cheap acrylic grinders crack over time, their teeth dull faster, and they sometimes leave small plastic particles in your ground flower, which defeats the purpose of grinding clean material in the first place.
The four types of grinders
Not every grinder is built the same way. Your choice here shapes how much material you recover from each grind and whether you collect kief at all.
| Type | Chambers | Best For |
|---|---|---|
| Two-piece | 1 (grinding only) | Minimalists, on-the-go use |
| Three-piece | 2 (grinding + collection) | Everyday use without kief collection |
| Four-piece | 3 (grinding + collection + kief) | Best all-around value and recovery |
| Electric | 1 (automated grinding) | High volume or accessibility needs |
A four-piece aluminum grinder is the best starting point for most people. The dedicated kief compartment alone pays for the upgrade within a few weeks of regular use.
For most sessions, including filling RAW cones, a four-piece grinder gives you the most control over grind texture and material recovery. Electric grinders are convenient but often grind too fine for cone filling and offer less control over the final consistency compared to a manual four-piece.
The parts of a four-piece grinder
Knowing each part by name speeds up the process and helps you troubleshoot when something feels off. A standard four-piece grinder breaks down into these four components:
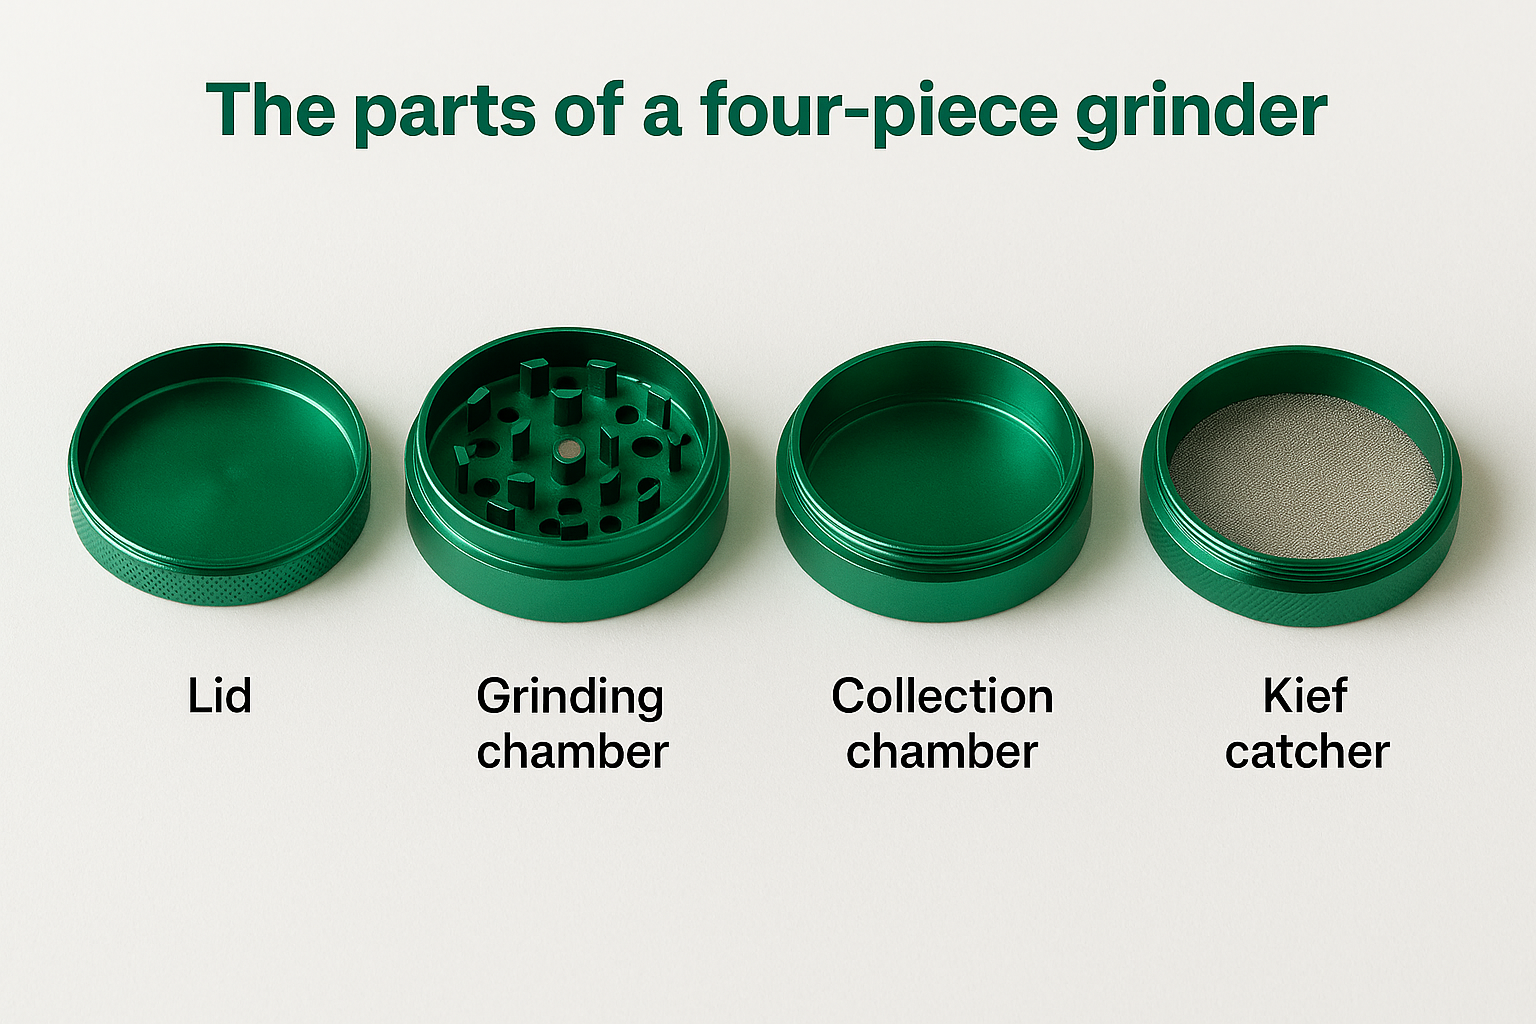
- Lid (top piece): The piece you grip with one hand. It holds teeth on the inside that face down into the grinding chamber below.
- Grinding chamber (second piece): The other half of the grinding teeth. This is where you load your flower before twisting.
- Collection chamber (third piece): Catches all ground material that falls through the holes after grinding. This is the material you scoop out and use.
- Kief catcher (bottom piece): A fine mesh screen separates this compartment from the collection chamber. Fine particles fall through over time and build up here.
Each piece threads or snaps together cleanly, so you can pull the whole unit apart for emptying and maintenance. Knowing these four parts gives you a clear mental map for every step that follows.
Step 2. Prep buds and remove stems
Prepping your flower before it goes into the grinder is a step most beginners skip, and it costs them every time. Stems are hard, woody, and do not grind down the same way as the bud itself. When stems go into the chamber, they dull the teeth over time, create uneven results, and make the twisting motion noticeably harder. Taking 60 seconds to prep your material correctly makes the grinding process smoother and extends the life of your grinder.
Why stems cause problems
Stems have a different density than flower, and that matters when you're learning how to use a weed grinder effectively. The teeth in your grinder are designed to shear through soft plant material. When a stem gets caught between them, it either bends without breaking or jams the mechanism entirely. Either outcome disrupts the even shearing action that produces a consistent grind.
Removing stems before loading is one of the easiest ways to protect your grinder and improve your grind quality at the same time.
Larger stems can also punch through the holes in the grinding chamber floor before the bud is properly broken down. That pushes woody chunks into your collection chamber, which then end up in your cone or bowl. Those stem pieces do not burn cleanly, and they affect the draw in a negative way.
How to break down buds before loading
Hold the bud over your rolling tray and pull the stem out from the base. Most stems come free with a simple pinch-and-pull motion. If the stem is thick and runs through the center of the bud, break the bud in half first, then remove each side of the stem separately.
After you remove the stems, break the remaining bud into pieces that fit comfortably between the grinder teeth without forcing the lid down. The target size is roughly the size of a small pea, around 5 to 7 millimeters. Pieces larger than that sit on top of the teeth instead of between them, and the grinder cannot shear through them properly.
Use this quick checklist before every grind:
- Remove the main stem by pinching the base of the bud and pulling firmly
- Break apart any large buds into pea-sized pieces
- Check for secondary woody stems running through the flower
- Discard stems separately rather than dropping them into the grinder
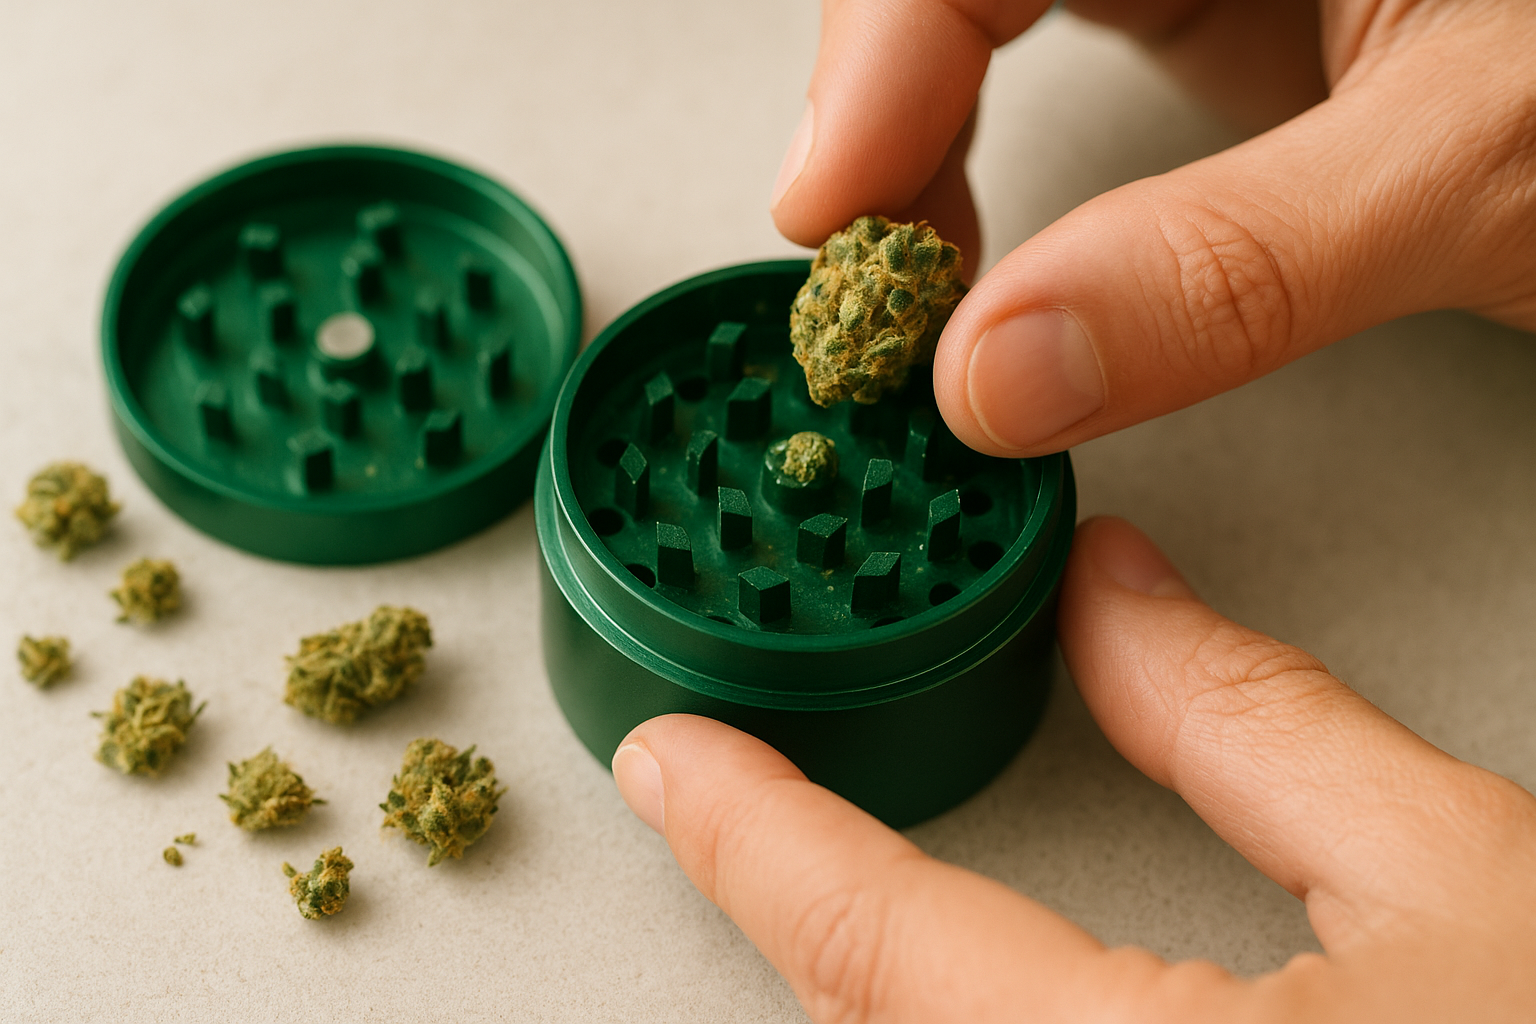
Step 3. Load and grind to the right texture
With your flower prepped and stems removed, loading the chamber correctly is the next part of knowing how to use a weed grinder without wasting material or damaging the teeth. Open the grinder by pulling the lid and grinding chamber apart. Place your pea-sized bud pieces between the teeth, not in the center hole. The center is just an opening for ground material to fall through, so any flower you drop there bypasses the teeth entirely and lands unground in the collection chamber below.
How to load the grinding chamber
Spread the bud pieces evenly around the teeth on one side rather than piling them in one spot. An even load lets the teeth engage from multiple angles as you twist, which produces a more consistent result. Aim to fill no more than two-thirds of the tooth area to give the material room to move during grinding. Overloading the chamber forces the teeth together too tightly, and the lid becomes hard to rotate without jamming. Smaller, even loads take only a few more seconds to prepare but save you from fighting a stuck grinder mid-session.
Use this quick reference for load size based on your session:
| Session size | Approximate bud load |
|---|---|
| Solo session (1 cone) | 0.3 to 0.5 grams |
| Small group (2 to 3 cones) | 0.7 to 1.2 grams |
| Larger group (4+ cones) | 1.5 grams, grind in batches |
Grinding in smaller batches gives you more control over texture and keeps the chamber from jamming mid-grind.
How to grind and check the texture
Close the lid firmly and hold the bottom section steady with one hand while you rotate the lid with the other. Use short, firm twists rather than long continuous rotations. Short twists let the teeth reset between passes, which produces a more even shear through the material. You will feel the resistance drop off after 8 to 12 rotations, which signals that the bud has broken down enough to fall through the holes.
Tap the grinder gently against your palm after grinding to help any remaining material drop into the collection chamber. Then unscrew the collection chamber from the grinding section and check the texture before you use it. For RAW cones, you want a medium-coarse grind, roughly similar to coarse sea salt in grain size. That texture packs the cone well without restricting airflow or leaving gaps that cause uneven burning from start to finish.
Step 4. Empty it, save kief, and clean it
Once you finish grinding, the last part of knowing how to use a weed grinder correctly is handling the output properly. This means emptying the collection chamber without waste, protecting the kief you have built up, and keeping the device clean enough to work well next time. Skipping the cleaning step is the single most common reason grinders jam or stop producing consistent results after a few weeks of regular use.
How to empty the collection chamber
Unscrew the collection chamber from the grinding section and hold it over your rolling tray before tapping it. A few firm taps against your palm or the edge of the tray dislodges any ground material that clings to the chamber walls. Use a small scraping tool or the edge of a rolling card to push all the ground flower toward one side so you can scoop or pour it directly into your cone or bowl without losing material to the sides.
Avoid blowing into the chamber to clear it. Your breath adds moisture, which causes ground flower to clump together and stick to the chamber walls more aggressively over time.
Save your kief the right way
The kief catcher sits at the base of a four-piece grinder and collects the fine, powdery material that passes through the mesh screen during every grind. This material accumulates slowly, so do not expect a full layer after one or two sessions. After a week or two of regular use, you will notice a visible buildup of pale golden powder covering the bottom of the compartment.
Store the kief catcher sealed and upright when transporting your grinder to keep the buildup from scattering before you are ready to use it.
Use a small, stiff brush (many grinders include one) to gather kief from the edges of the compartment toward the center. From there, a flat tool like a guitar pick or the flat edge of a knife lets you collect it cleanly and add it directly to your next session.
Clean the grinder regularly
A clean grinder produces a consistent grind every time and lasts significantly longer than one left to build up residue. Follow this cleaning routine every two to three weeks depending on how often you grind:
- Disassemble all four pieces completely
- Soak the aluminum pieces in isopropyl alcohol (90% or higher) for 20 to 30 minutes
- Scrub the teeth and screen gently with a stiff brush
- Rinse each piece with warm water and let all components dry fully before reassembling
Keep your sessions smooth
Knowing how to use a weed grinder comes down to four repeatable steps: pick the right grinder, prep your flower, load and grind to the right texture, and keep the device clean. Each step builds on the last, and once you run through the process a handful of times, the whole routine takes under two minutes from start to finish. The payoff is a consistent, even burn every session without the waste and frustration that comes from hand-breaking flower.
Your grinder is only part of the equation. What you fill matters just as much as how you grind. RAW pre-rolled cones are designed to pair with a medium-coarse grind, and when you get both right, the result is a slow, clean burn from start to finish. If you want cones that match the quality of your grind, shop RAW cones at Green Blazer and stock up on the authentic product built for exactly this kind of session.