

Rolling your own cigarettes or joints is one thing, crafting a custom blend from scratch is another level entirely. More smokers are learning how to make herbal smoking blends at home, mixing dried herbs like mullein, damiana, and lavender into personalized combinations that suit their taste and desired experience. But without the right knowledge, you can end up with a harsh, uneven smoke, or worse, use an herb that isn't safe to inhale.
The key lies in understanding which herbs work as a base, which add flavor or effect, and how to mix them in the right ratios. Getting this balance wrong means a blend that burns too fast, tastes bitter, or simply falls apart. Getting it right means a smooth, slow-burning session you actually enjoy.
This guide walks you through every step, from selecting safe, smokable herbs to blending, drying, and packing them properly. And once your blend is ready, RAW pre-rolled cones from Green Blazer give you a consistent, additive-free vessel that lets your herbs shine without any chemical interference. No rolling skills required, just fill, pack, and light.
Safety first: what to know before you smoke herbs
Not every herb on your kitchen shelf belongs in a smoking blend. Herbal smoking carries real risks when you skip the safety checks, and the most common mistake beginners make is assuming that "natural" automatically means "safe to inhale." Some plants are completely harmless as teas or topicals but produce toxic compounds when burned, and inhaling those compounds directly affects your lungs and throat. Starting with solid safety knowledge is the most important step in this whole process.
Know which herbs are smokable
Before you learn how to make herbal smoking blends, you need a reliable list of herbs with a documented history of being smoked safely. The herbs below are widely used in traditional smoking blends and are generally considered safe for inhalation when sourced correctly and used in moderation:
- Mullein (Verbascum thapsus): lightweight, mild, and a classic base herb
- Damiana (Turnera diffusa): slightly sweet, burns cleanly, common in blends
- Lavender (Lavandula angustifolia): adds aroma; use sparingly to avoid harshness
- Skullcap (Scutellaria lateriflora): smooth smoke with a mild, earthy flavor
- Passionflower (Passiflora incarnata): light, gentle, and burns evenly
- Raspberry leaf (Rubus idaeus): neutral flavor, similar in texture to tobacco
- Rose petals (Rosa spp.): light floral note that burns well in small amounts
- Peppermint (Mentha piperita): cooling effect; keep it to a small percentage of your blend
Always source your herbs from a reputable supplier that sells food-grade or certified organic dried botanicals. Herbs treated with pesticides or preservatives release those chemicals when burned, and you breathe them in directly.
Herbs you should never smoke
Several popular herbs become dangerous when combusted, and this surprises many people because these plants are widely used in other forms. Avoid all of the following in any smoking blend:
- Comfrey (Symphytum officinale): contains pyrrolizidine alkaloids that are toxic when inhaled
- Lobelia (Lobelia inflata): highly potent; can cause vomiting, rapid heartbeat, and breathing difficulty
- Wormwood (Artemisia absinthium): contains thujone, which is toxic at inhaled doses
- Sage in large quantities: small amounts are generally fine, but high concentrations irritate airways significantly
- Any herb you cannot positively identify: if you are unsure what the plant is, do not smoke it
Watch how your body responds
Individual reactions vary significantly, even with herbs that are widely considered safe. Lavender might work perfectly for one person while causing throat irritation for another. Start with small test sessions using a single herb before combining multiple plants, and pay close attention to any coughing, chest tightness, or dizziness that shows up after smoking.
Sourcing matters just as much as herb selection. Buy dried herbs from reputable food-grade suppliers, not from gardening stores where plants are often treated with fungicides or fertilizers. If you grow your own, make sure the plants are pesticide-free and fully dried before use. Moisture in your herbs causes uneven burning and can introduce mold spores directly into your lungs, which is a problem no blend ratio can fix.
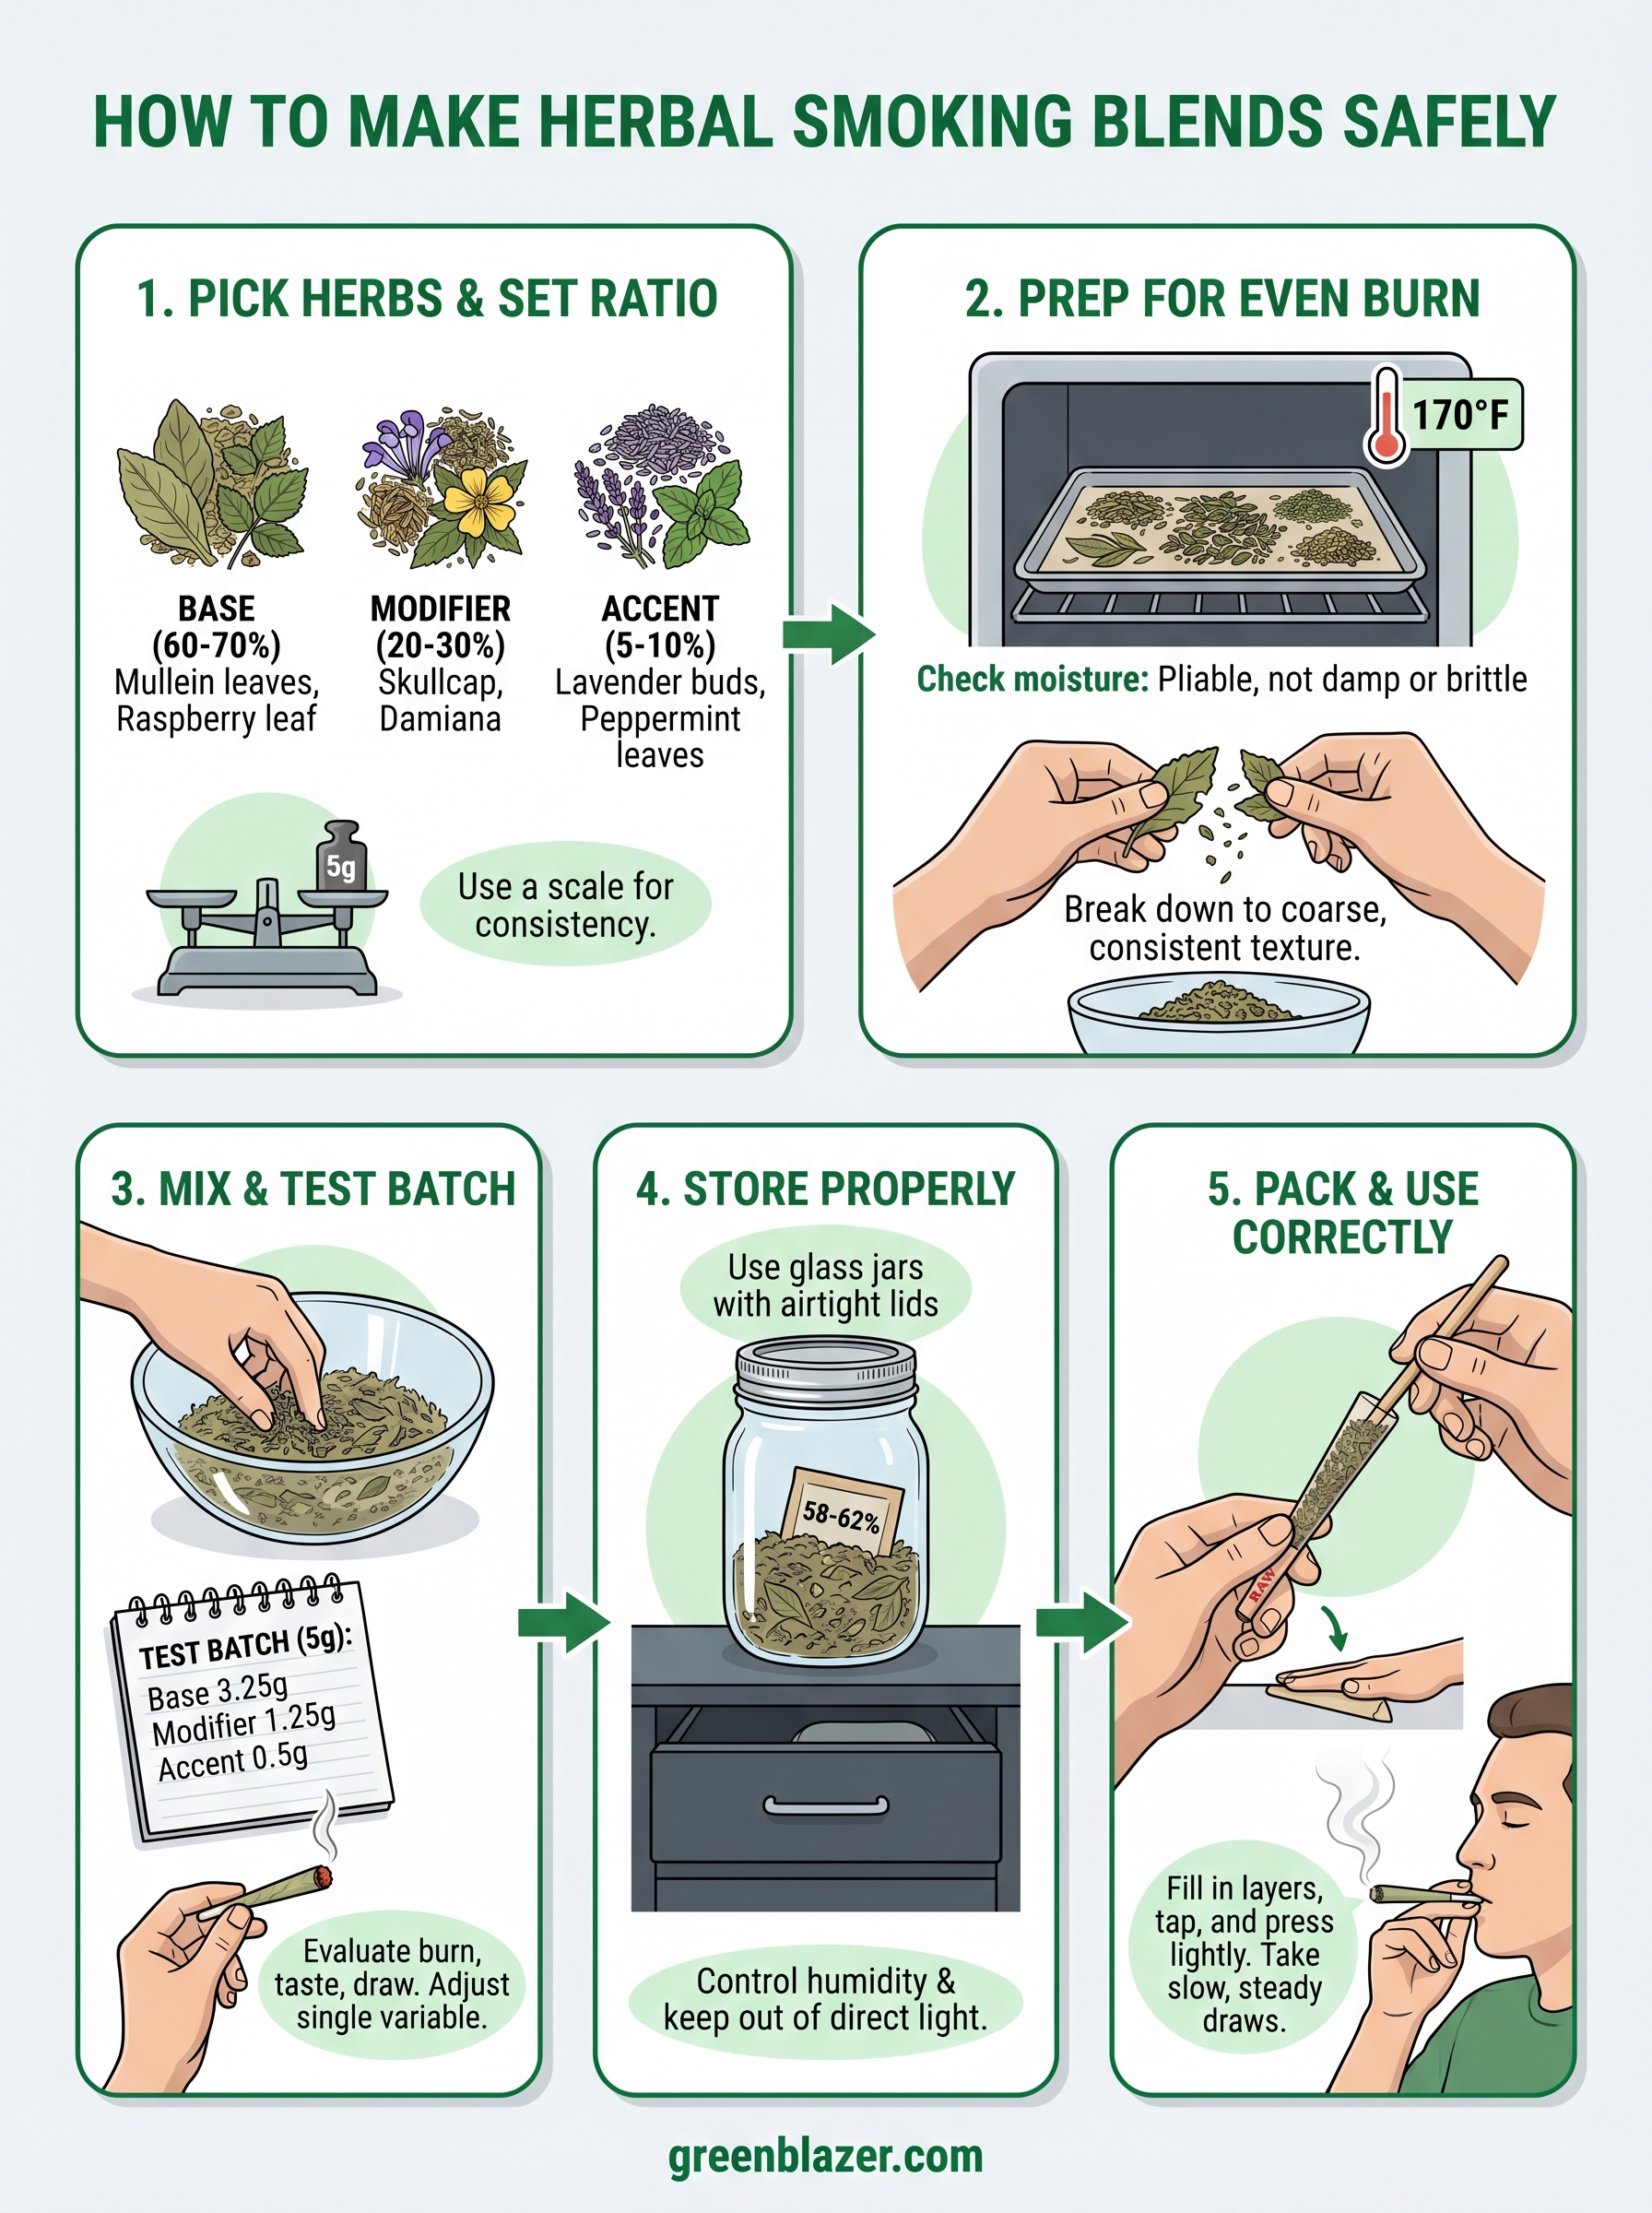
Step 1. Pick your herbs and set your blend ratio
Every successful herbal blend follows a clear structure: base herbs, modifier herbs, and accent herbs. Each category plays a different role in how your blend burns, tastes, and feels. Picking the right herbs for each slot is the foundation of learning how to make herbal smoking blends that actually work.
Understand the three herb categories
Base herbs make up the bulk of your blend, usually 60-70% of the total weight. They burn slowly and evenly, carry the other herbs without overpowering them, and keep the smoke mild. Mullein, raspberry leaf, and damiana are the most reliable base herbs for beginners because they are widely available in food-grade form and forgiving when you get the ratios slightly off.
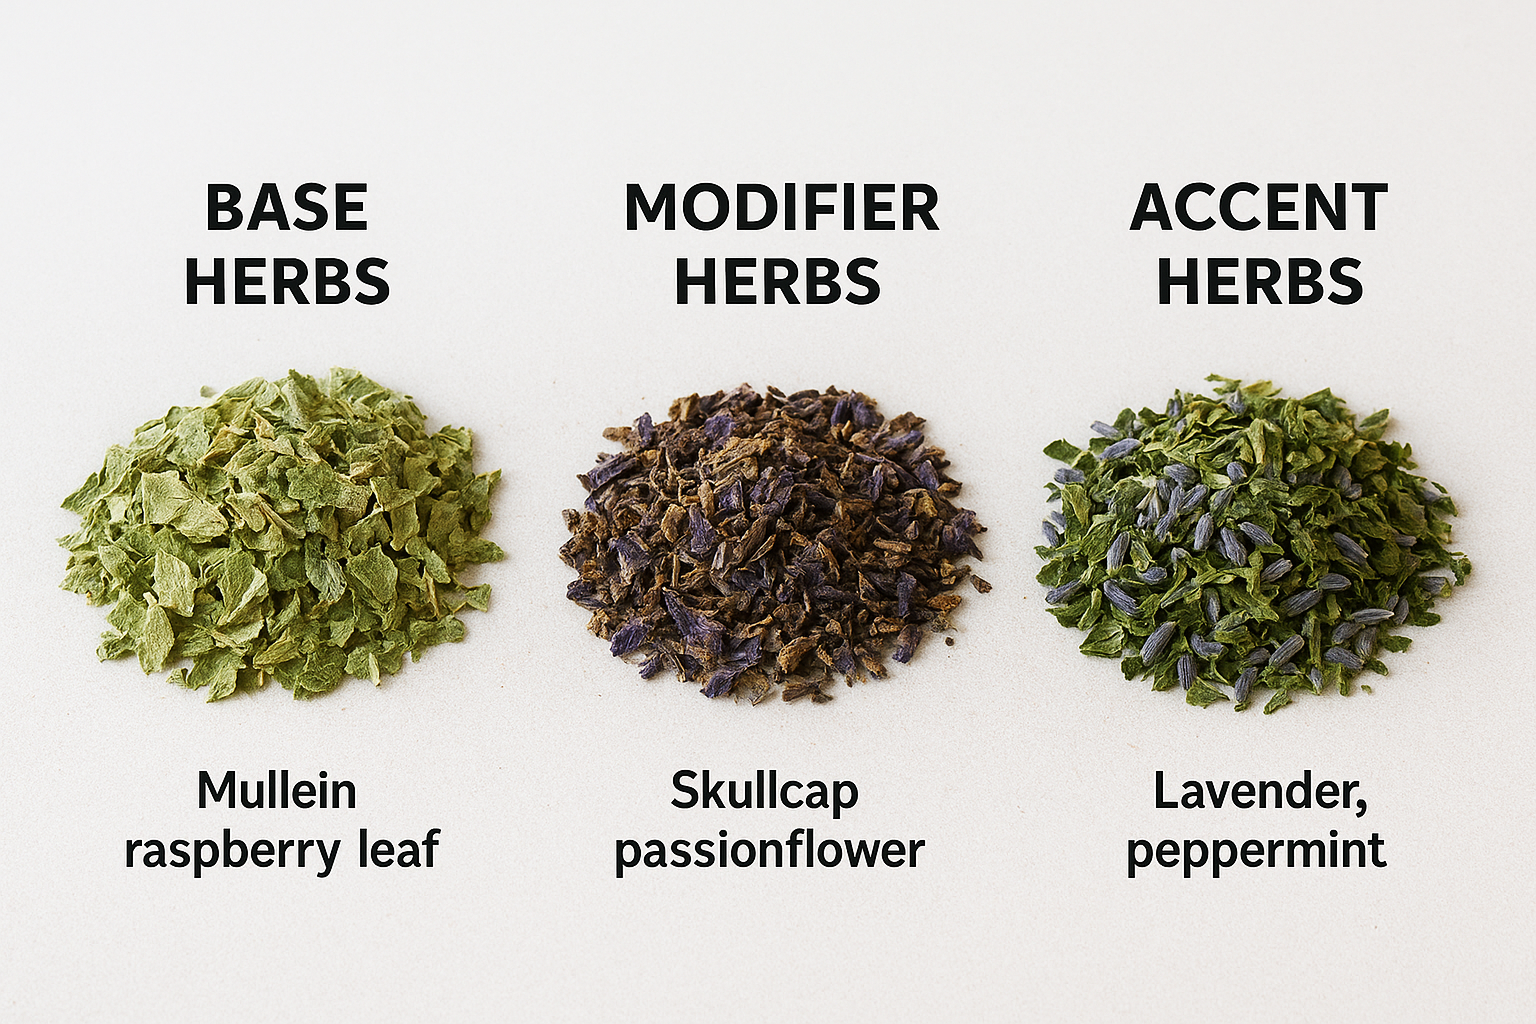
Modifier herbs add distinct character to your blend and sit at around 20-30% of the total weight. Skullcap, passionflower, and rose petals are common modifier choices that layer in flavor or effect without overwhelming the base. Think of them as the middle layer that bridges your neutral base and the more aromatic accents.
Accent herbs bring the finishing touches and make up just 5-10% of your blend. Lavender, peppermint, and chamomile fall here. These herbs are potent, and even a small amount changes the entire character of your smoke. Use them sparingly until you know how each one behaves in your specific mix.
Set your starting ratio
Start with this beginner-friendly ratio template before experimenting with custom percentages:
| Role | Example herbs | Target percentage |
|---|---|---|
| Base | Mullein, raspberry leaf | 60-70% |
| Modifier | Damiana, skullcap | 20-30% |
| Accent | Lavender, peppermint | 5-10% |
A 65/25/10 split (base/modifier/accent) is a reliable starting point for most first blends and gives you clear room to adjust each layer independently.
Weigh your herbs rather than measuring by volume. Dried herbs have different densities, and a tablespoon of mullein is not the same quantity as a tablespoon of lavender. A kitchen scale accurate to 0.1g keeps your ratios repeatable from batch to batch and removes the guesswork.
Step 2. Prep your herbs for a smooth, even burn
Picking the right herbs is only half the job. How you prepare them before mixing determines whether your blend burns clean and even or turns into a harsh, uneven experience. Most problems people run into when learning how to make herbal smoking blends come down to skipping the prep work, not choosing the wrong herbs.
Check and adjust your moisture levels
Your herbs need to hit a specific moisture window before you mix them. Too wet and they will not burn properly, smoldering unevenly and producing thick, unpleasant smoke. Too dry and they crumble into powder, burn too fast, and produce a hot, sharp hit that irritates your throat.
The target feel is similar to pipe tobacco fresh from a sealed pouch: pliable but not damp, with leaves that bend without crumbling when you pinch them.
To reach that sweet spot, spread your herbs on a clean baking sheet in a single layer and place them in your oven at the lowest setting, usually around 170°F (77°C), for five to ten minutes. Check them every few minutes and pull them out once they feel slightly leathery but no longer brittle. Let them cool fully before moving to the next step, because residual heat continues drying them after you remove them from the oven.
Break down your herbs to the right texture
Texture consistency across all your herbs is what gives you an even burn. If your base herb is finely shredded and your modifier herb is in large whole leaves, the blend will not pack or burn uniformly. You want everything in your mix to land at roughly the same coarse, flaky texture, similar to loosely shredded tobacco.
Use your fingers to break down larger leaves by hand, which gives you more control than a grinder and reduces the chance of turning everything into powder. A hand-held herb grinder works well for tougher stems and thicker leaves like raspberry leaf or dried damiana. Run each herb separately before combining them, then check that no large chunks or fine dust are dominating any single ingredient. Removing both extremes before mixing keeps your final blend consistent.
Step 3. Mix a small test batch and dial it in
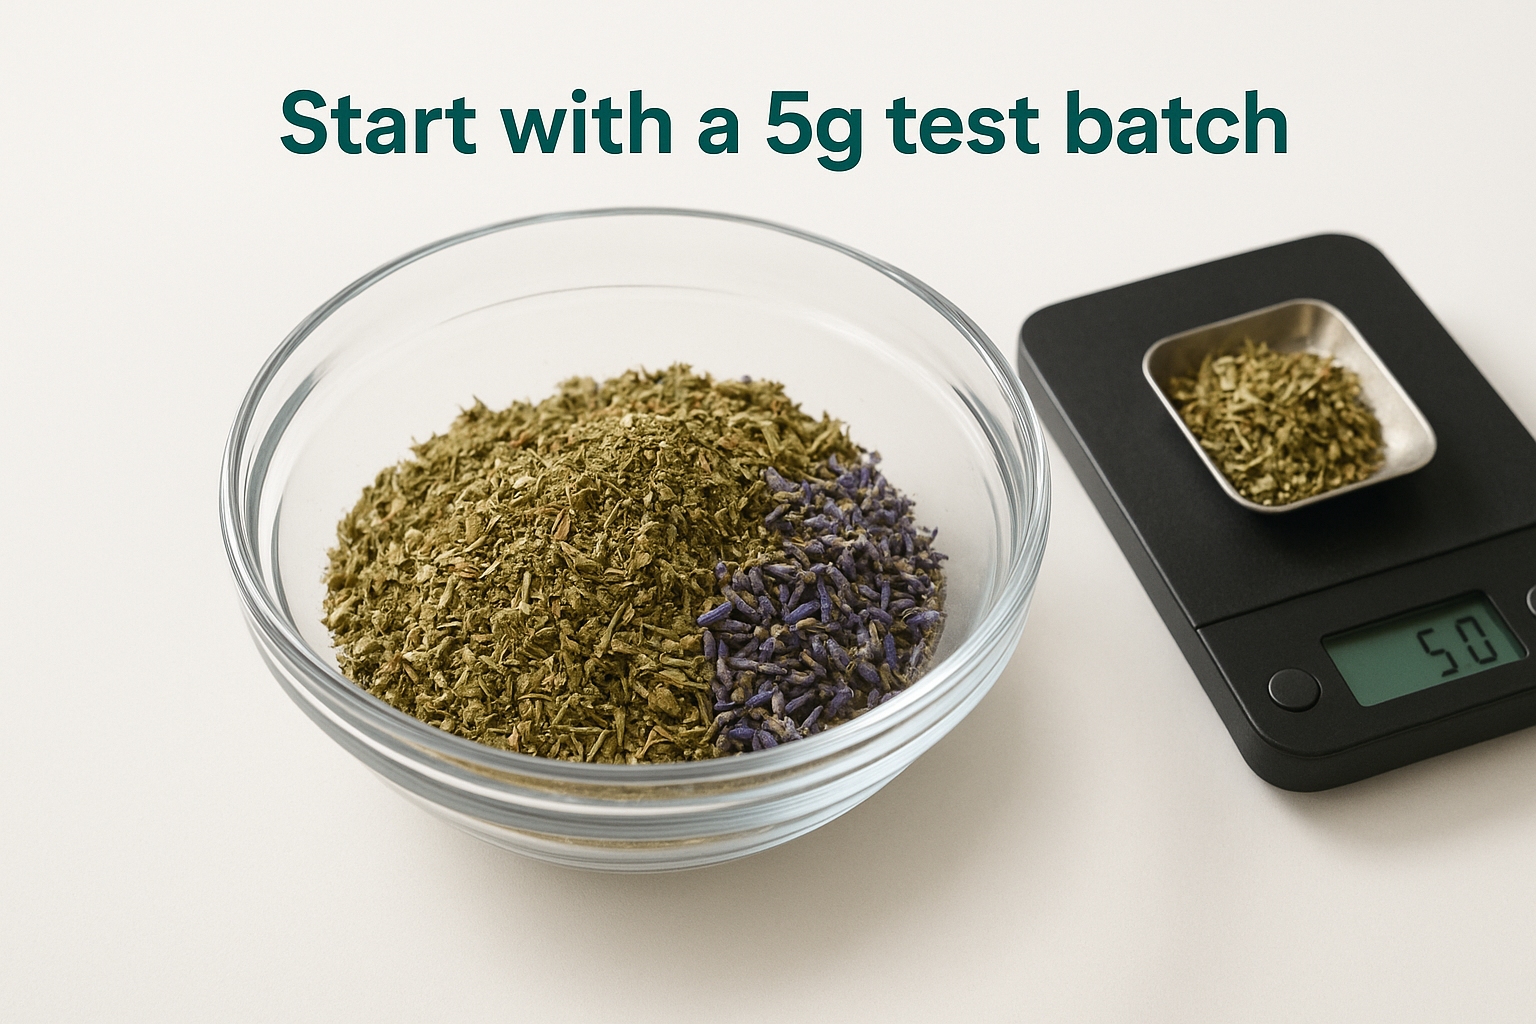
Jumping straight into a large batch is one of the most common mistakes people make when learning how to make herbal smoking blends. A small 5g test batch lets you evaluate burn quality, taste, and texture before committing your full herb supply to a ratio that might need significant work. Treating every first attempt as a draft rather than a final product keeps the process low-stakes and makes improvement much easier to track.
Start with a 5g test batch
Working at a 5g scale keeps your material investment low while giving you enough blend to smoke and evaluate properly. Weigh each herb individually before combining them, using the 65/25/10 ratio from Step 1 as your starting baseline. Here is what those percentages look like at a 5g scale:
| Role | Herb example | Amount (5g batch) |
|---|---|---|
| Base (65%) | Mullein | 3.25g |
| Modifier (25%) | Damiana | 1.25g |
| Accent (10%) | Lavender | 0.5g |
Once you have your measured herbs, combine them in a clean glass bowl and mix gently with your fingers, turning and folding the mixture rather than pressing down. You want an even distribution of all three layers without breaking the herbs down further into fine dust.
Evaluate and adjust your ratios
Pack a small amount of your test blend into a RAW pre-rolled cone and smoke it slowly, paying attention to three specific things: how evenly it burns, how the flavor builds across the session, and whether the draw feels open or tight. Write your observations down immediately after smoking while the experience is still clear in your head.
Keep a dedicated notebook next to your workspace and log every batch with its exact gram amounts, herbs used, and post-session notes. This turns the process into a repeatable, improvable system rather than a guessing game.
Adjust only one variable at a time between test batches. If the smoke burns harsh or fast, increase your base herb by 5% and reduce the modifier accordingly. If the blend tastes flat, bump the modifier up by 5% and retest. Single-variable adjustments let you pinpoint exactly what changed and why, which speeds up dialing in a blend you genuinely enjoy.
Step 4. Store your blend so it stays fresh and clean
Once you finish dialing in your batch, how you store it matters almost as much as how you made it. A well-crafted blend degrades quickly when exposed to air, humidity, or direct light, and the same herbs you worked to get just right will turn stale, grow mold, or lose their aroma within days if stored carelessly. Proper storage is the step most guides on how to make herbal smoking blends skip entirely, and it is where a lot of good work gets wasted.
Pick the right container
Glass is the best storage material for dried herbal blends by a clear margin. It does not absorb odors or moisture the way plastic does, and it creates a neutral environment that protects your herbs without adding any off-flavors over time. Mason jars with airtight lids are the most practical option since they are inexpensive, widely available, and come in multiple sizes that match both small test batches and larger finished blends.
Plastic bags and unsealed metal tins both compromise your blend faster than most people expect. Plastic transfers chemical odors directly into your herbs, while metal tins without a rubber seal allow enough airflow to dry your blend unevenly over time, altering the texture and burn quality you spent time calibrating.
Control humidity and light exposure
Moisture and light are the two fastest ways to ruin a stored blend. If your blend retains too much moisture inside the jar, mold develops within days, and there is no salvaging a moldy batch. A small food-safe humidity pack calibrated at 58-62% relative humidity keeps your blend in the right moisture range without requiring you to monitor it constantly. You can find these packs sold for cigar and tobacco storage through general retailers.
Store your jar in a cool, dark drawer or cabinet rather than on a countertop where temperature swings and sunlight accelerate degradation.
Direct light breaks down the aromatic compounds in herbs like lavender and peppermint faster than any other storage variable. Keep your container completely out of sunlight and away from heat sources like stovetops or windowsills. A properly sealed glass jar stored in a dark, stable-temperature location keeps most herbal blends fresh for four to six weeks without any noticeable loss in quality.
Step 5. Pack and use your blend the right way
All the work you put into learning how to make herbal smoking blends comes down to this final step. How you fill and use your cone affects burn quality, airflow, and overall experience just as much as your herb selection and ratios do. Rushing the pack or overfilling the cone undoes everything you dialed in during testing, so treat this step with the same care you applied to blending and prep.
Fill your cone in layers
RAW pre-rolled cones make the filling process significantly easier than rolling by hand, but the technique still matters. Work in small increments rather than dumping your entire portion into the cone at once. Add a small pinch of blend, tap the cone gently on a firm surface, then add another pinch and repeat until you reach just below the rim. This layered approach prevents air pockets that cause uneven burns or runs during the smoke.
Tapping the cone on a flat surface between each layer lets gravity settle the blend evenly without you needing to force it down with a packing tool.
Use the wooden packing stick included with most RAW cone packs to lightly compress the blend after every two or three layers. Press down with consistent, light pressure, not a hard shove that collapses the cone walls. Your goal is a firm but not dense pack that allows air to move through the blend freely from tip to filter.
Pace yourself during the session
How you smoke your blend directly affects how it burns. Taking slow, steady draws gives the blend time to combust properly and produces cleaner flavor while keeping the burn line moving evenly across the entire cross-section. Quick, repeated pulls overheat the blend and create the harsh, uneven burn that proper packing was supposed to prevent.
Let the cone rest for a few seconds between draws. If you notice the burn favoring one side, rotate the cone slightly and draw slowly to even it out. A properly packed, well-mixed blend should hold a consistent, circular burn front from the first draw to the last. If it does not, revisit your herb texture from Step 2, since uneven particle sizes are the most common cause of uneven burns.
A safer way to keep experimenting
Learning how to make herbal smoking blends is a process that rewards patience and systematic testing. Every batch you mix teaches you something, whether that is how a particular herb behaves under heat or how small ratio adjustments change the entire character of a smoke. The five steps in this guide give you a repeatable framework you can return to with any new herb combination you want to try.
Your choice of cone matters as much as your blend does. RAW pre-rolled cones from Green Blazer are additive-free, unbleached, and built for a slow, even burn that lets your herbs perform exactly as intended without chemical interference. Whether you are testing a new ratio or packing your best batch yet, having a consistent, quality cone makes every session a clean read on how well your blend actually works.