

A sticky, clogged grinder kills your session before it starts. Residue builds up on the teeth and screen, your herb comes out uneven, and kief collection drops to almost nothing. If you've been putting off learning proper grinder cleaning tips, you're leaving performance (and potency) on the table. The same applies to coffee grinders, built-up oils and old grounds turn your morning cup bitter and stale.
At Green Blazer, we sell grinders and smoking accessories alongside our RAW pre-rolled cones because we know the prep work matters just as much as the smoke itself. A clean grinder means a consistent, fine grind that packs cones evenly and burns the way it should, no hot spots, no waste. We've picked up a few things from helping thousands of customers dial in their setup.
This guide breaks down practical, step-by-step methods for deep-cleaning both herb and coffee grinders. You'll learn which household supplies actually work, how to recover trapped kief, and how often to clean based on your usage. Whether you grind daily or just a few times a week, these techniques will keep your grinder performing like new.
What you need and safety basics
Before you start scrubbing, take two minutes to gather your supplies. Going in without the right tools means you'll either cut corners or risk damaging your grinder. Most of what you need is already in your kitchen or bathroom, and the rest costs next to nothing at a grocery store. Having everything laid out in front of you keeps the process quick and controlled rather than turning into a multi-step hunt around the house.
Supplies for the job
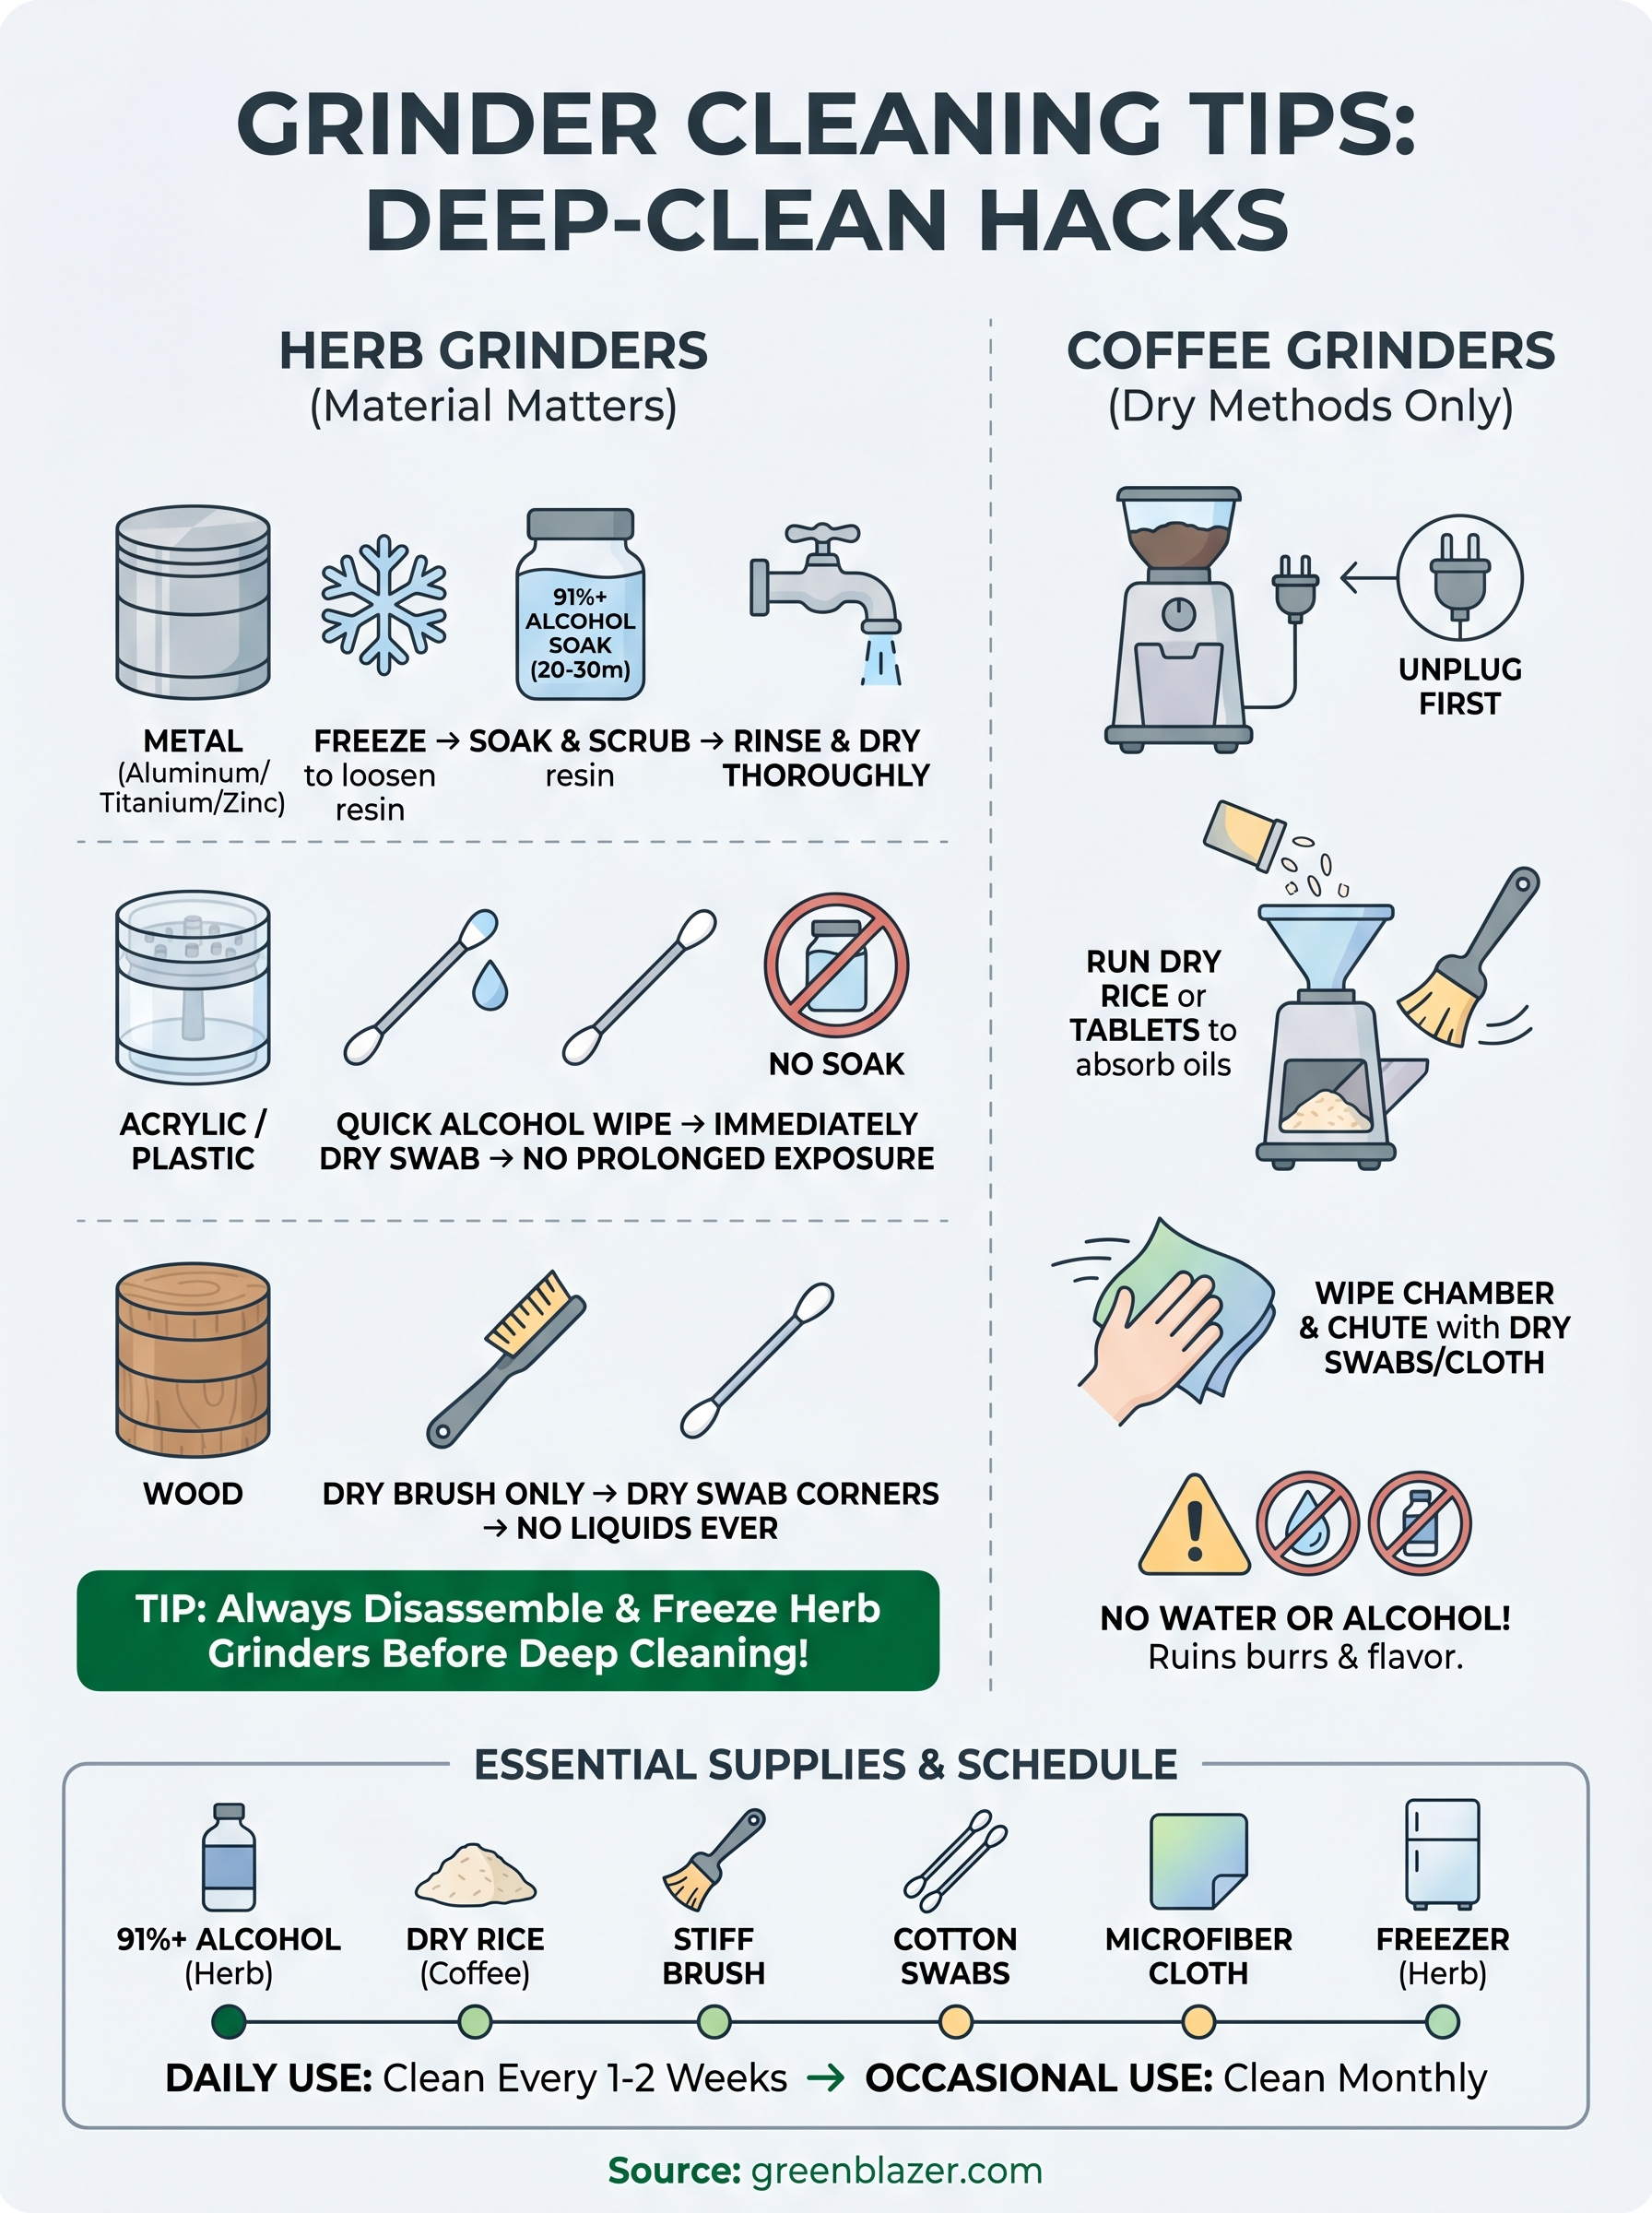
The specific supplies depend on whether you're cleaning an herb grinder or a coffee grinder, but there's a lot of overlap. Isopropyl alcohol at 91% concentration or higher is the workhorse for herb grinders because it breaks down sticky resin without leaving harmful residue. For coffee grinders, skip alcohol entirely and use dry rice or dedicated grinder-cleaning tablets instead, since alcohol affects the taste of your grounds and is harder to rinse out of burr mechanisms.
Here's a quick supply checklist to have ready before you start:
| Item | Herb grinder | Coffee grinder |
|---|---|---|
| Isopropyl alcohol (91%+) | Yes | No |
| Small stiff-bristle brush or toothbrush | Yes | Yes |
| Toothpicks or wooden skewers | Yes | Yes |
| Warm water and dish soap | Yes (for metal/acrylic) | No |
| Paper towels and microfiber cloth | Yes | Yes |
| Small container or zip-lock bag | Yes (for soaking) | No |
| Dry uncooked white rice | No | Yes |
| Cotton swabs | Yes | Yes |
| Freezer access | Optional but recommended | No |
Avoid using water on any grinder part until you confirm the material is water-safe. Some metal grinders with painted finishes or acrylic components can warp or corrode with repeated exposure.
Safety rules before you start
A few basic safety steps protect both you and your grinder. Always disassemble your grinder completely before you clean so you can reach every surface and don't accidentally trap cleaning solution in the threads or kief chamber. For herb grinders, place the fully disassembled grinder in the freezer for 20 to 30 minutes before your cleaning session. Cold temperatures make resin brittle and far easier to knock loose without heavy scrubbing.
Keep these rules in mind every time you clean, regardless of which grinder cleaning tips you use:
- Never submerge an electric coffee grinder or any grinder with electrical components in any liquid
- Avoid bleach, acetone, or harsh chemical solvents on any grinder material
- Let all parts dry completely before reassembling, since even a small amount of trapped moisture causes rust on metal components
- Work in a well-ventilated space if you're using isopropyl alcohol
- Check your grinder's material before soaking in alcohol, because some anodized finishes dull with repeated exposure
Wooden or painted grinders need the most caution throughout this process. Alcohol strips coatings and water warps wood, so stick to dry brushing and cotton swabs for those types. Taking 60 seconds to confirm your grinder's materials before you start saves you from a ruined finish or an incomplete clean that leaves residue behind.
Step 1. Figure out what you're cleaning
Before you apply any grinder cleaning tips from this guide, you need to identify exactly what you're working with. The type of grinder and the material it's made from determine which cleaning method is safe and which will cause damage. Skipping this step is how people strip anodized finishes or crack acrylic chambers before they even get to the cleaning part.
Herb grinder or coffee grinder?
These two grinder types look similar from the outside, but they require completely different cleaning approaches. Herb grinders collect sticky resin and kief, which respond well to isopropyl alcohol and freezing. Coffee grinders accumulate oils and fine ground particles that absorb odors and flavors, making alcohol a poor choice since residue clings to the burrs and contaminates future batches.
Check the grinding chamber if you're unsure which type you have. Herb grinders typically have a kief catcher screen at the bottom, while coffee grinders have either flat or conical burrs (or a blade) and no screen compartment at all.
What material is your grinder made from?
Your grinder's material controls how aggressively you can clean it. Metal grinders (aluminum, titanium, zinc alloy) handle isopropyl alcohol soaks without issue in most cases. Acrylic and plastic grinders tolerate a quick alcohol wipe, but should never be soaked since prolonged exposure makes them brittle and cloudy. Wooden grinders need dry cleaning only.
Confirm your grinder's material before doing anything else. Using the wrong cleaning method on the wrong material causes permanent damage that no amount of scrubbing will fix.
| Material | Alcohol soak | Warm water rinse | Dry brush only |
|---|---|---|---|
| Aluminum/titanium | Yes | Yes | No |
| Zinc alloy | Yes | Yes | No |
| Acrylic/plastic | No | Yes (brief) | Yes |
| Wood | No | No | Yes |
How dirty is it?
Light buildup calls for a quick clean that takes under 10 minutes. Heavy resin caking, a clogged screen, or a grinder that hasn't been cleaned in months requires a full deep clean with soaking and detailed brushwork. Knowing the difference upfront saves you from over-cleaning a lightly used grinder or under-cleaning one that's genuinely gunked up.
Step 2. Quick clean for herb grinders
A quick clean takes 10 minutes or less and handles light to moderate buildup before it turns into the thick, sticky resin that requires a full soak. If your grinder still spins smoothly but the teeth look coated with fine herb residue, or if your kief screen has a thin layer of powder blocking it, a quick clean is the right move right now. Don't wait until grinding becomes a workout.
When a quick clean is enough
Use a quick clean if you grind a few times per week and have kept up with at least occasional maintenance. You'll know it's time when herb starts clumping instead of grinding into an even, fluffy consistency, or when the kief collection in the bottom chamber slows down noticeably. A quick clean also works well between deep cleans to extend how long your grinder stays functional.
If your grinder has gone months without any cleaning or the threads are visibly gunked up, skip this step and go straight to Step 3 for a full deep clean by material.
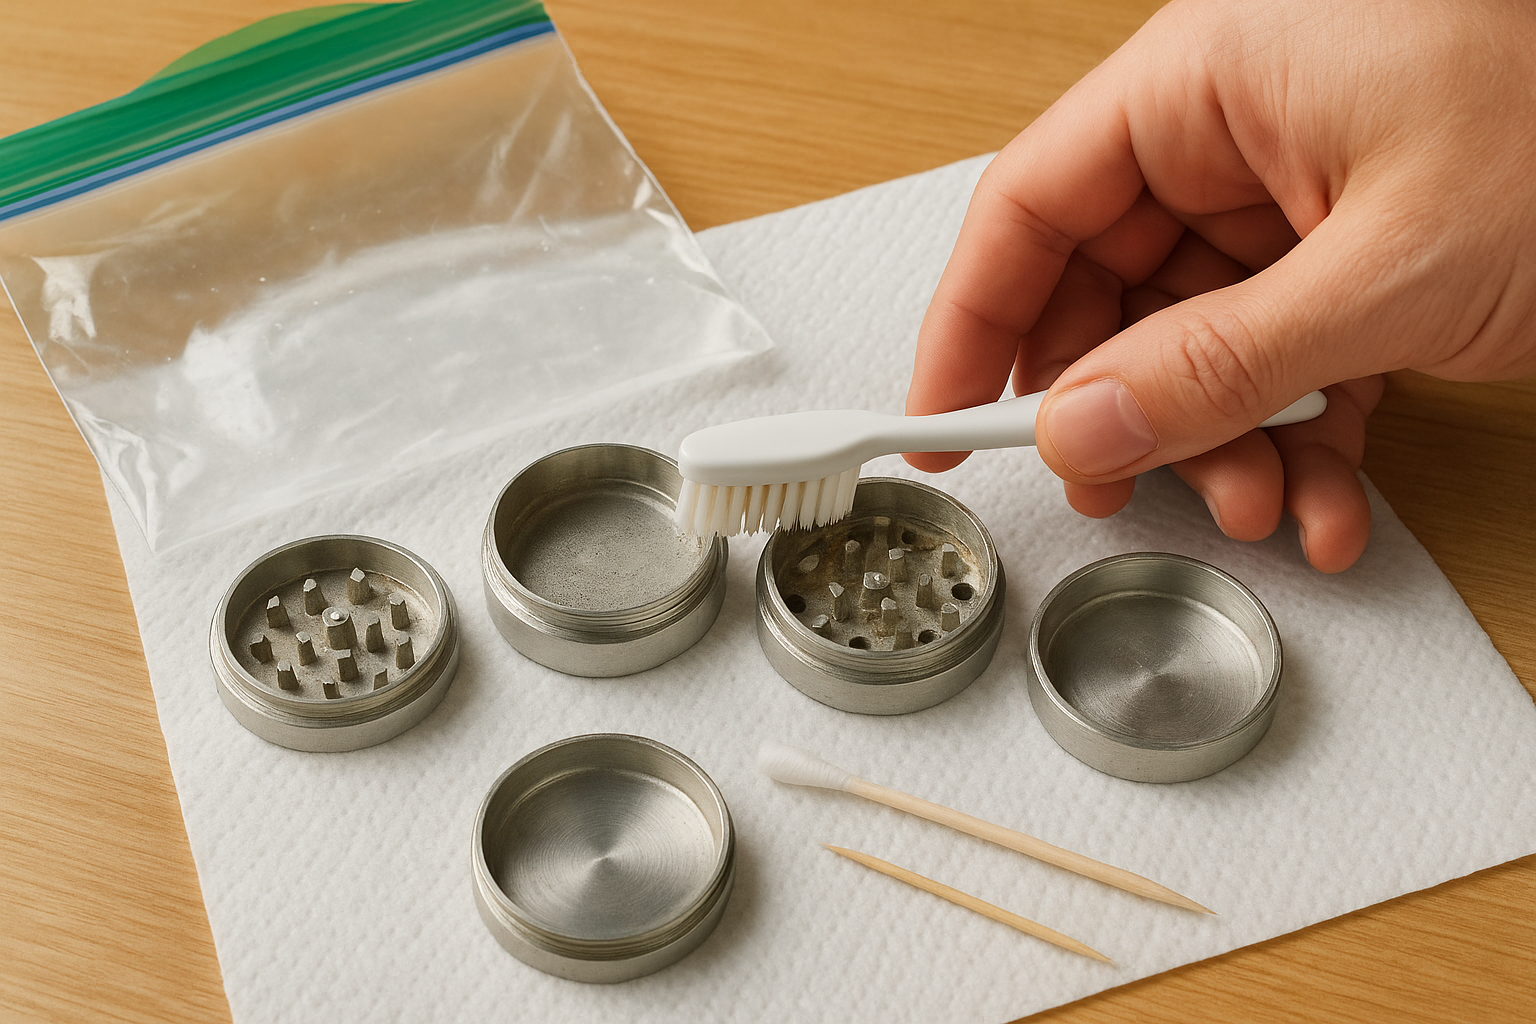
How to do a 10-minute quick clean
Start by fully disassembling your grinder into all its separate pieces: lid, grinding chamber, collection chamber, and kief catcher. Tap each piece firmly against a sheet of paper to knock loose any dry herb and collect it. Then grab your stiff-bristle brush or toothbrush and scrub the teeth, walls, and screen using short, firm strokes to dislodge residue without bending the screen mesh.
Follow these steps in order for the best result:
- Disassemble completely and tap each piece onto clean paper
- Brush teeth, chamber walls, and screen with a stiff toothbrush
- Use a toothpick to clear any clogged screen holes individually
- Wipe all surfaces with a cotton swab lightly dampened with isopropyl alcohol
- Let parts air dry for five minutes before reassembling
These grinder cleaning tips work well on aluminum and zinc alloy grinders. Skip the alcohol swab on acrylic or painted grinders and use a dry cotton swab instead to avoid clouding or stripping the finish. Run through these five steps once a week if you grind daily, or every two to three weeks for lighter use.
Step 3. Deep clean herb grinders by material
When light brushing doesn't cut through the buildup, a deep clean is the only way to fully restore your grinder's performance. The method you use depends entirely on what your grinder is made from, so match the technique to the material every time. These grinder cleaning tips give you a safe, effective process for each type without risking damage to the finish or structure.
Metal grinders (aluminum, titanium, zinc alloy)
Metal grinders handle the most aggressive cleaning approach and benefit the most from it. Start by placing your fully disassembled grinder in the freezer for 20 to 30 minutes so the resin becomes brittle and snaps off instead of smearing when you scrub it. After the freeze, knock each piece against a hard surface over clean paper to collect loose kief, then drop all metal parts into a zip-lock bag filled with 91%+ isopropyl alcohol and let them soak for 20 to 30 minutes.
For heavily caked screens, use a soft toothbrush dipped in alcohol and scrub in small circular motions to push residue through the mesh rather than spreading it across the surface.
Follow these steps after the soak:
- Remove parts and scrub every surface with a stiff toothbrush
- Use a toothpick to clear individual screen holes
- Rinse all parts under warm water and scrub with a drop of dish soap
- Dry thoroughly with a microfiber cloth, then let air dry for at least 30 minutes before reassembling
Acrylic and plastic grinders
Acrylic grinders can't handle prolonged alcohol exposure or hot water since both cause cracking, cloudiness, and warping over time. Instead, wipe down every surface with a cotton swab lightly dampened with isopropyl alcohol, working quickly and following with a dry swab immediately after to pull away any remaining moisture before it sits on the surface.
Wooden grinders
Wooden grinders need dry cleaning only, no liquids of any kind. Use a stiff dry brush to scrub the teeth and chamber walls, then work a dry toothpick through any clogged holes or threads. Finish with a dry cotton swab to pull residue out of tight corners without introducing any moisture that could cause the wood to swell or crack.
Step 4. Clean a coffee grinder the right way
Coffee grinders demand a completely different approach than herb grinders because water and alcohol degrade flavor and can damage burr mechanisms over time. Your goal is to remove built-up oils and stale grounds without introducing any moisture that clings to burrs and ruins your next brew. Apply these grinder cleaning tips consistently, and your coffee will taste noticeably fresher within a use or two.
Remove loose grounds first
Start by unplugging your grinder completely before touching anything inside. Tip the grinder upside down over a trash can to shake out as much loose material as possible, then use a stiff dry toothbrush to sweep the hopper, grinding chamber, and any visible burr surfaces clean of fine powder.
Never run a vacuum directly inside the grinding chamber since strong suction can dislodge small burr components or shift their calibration.
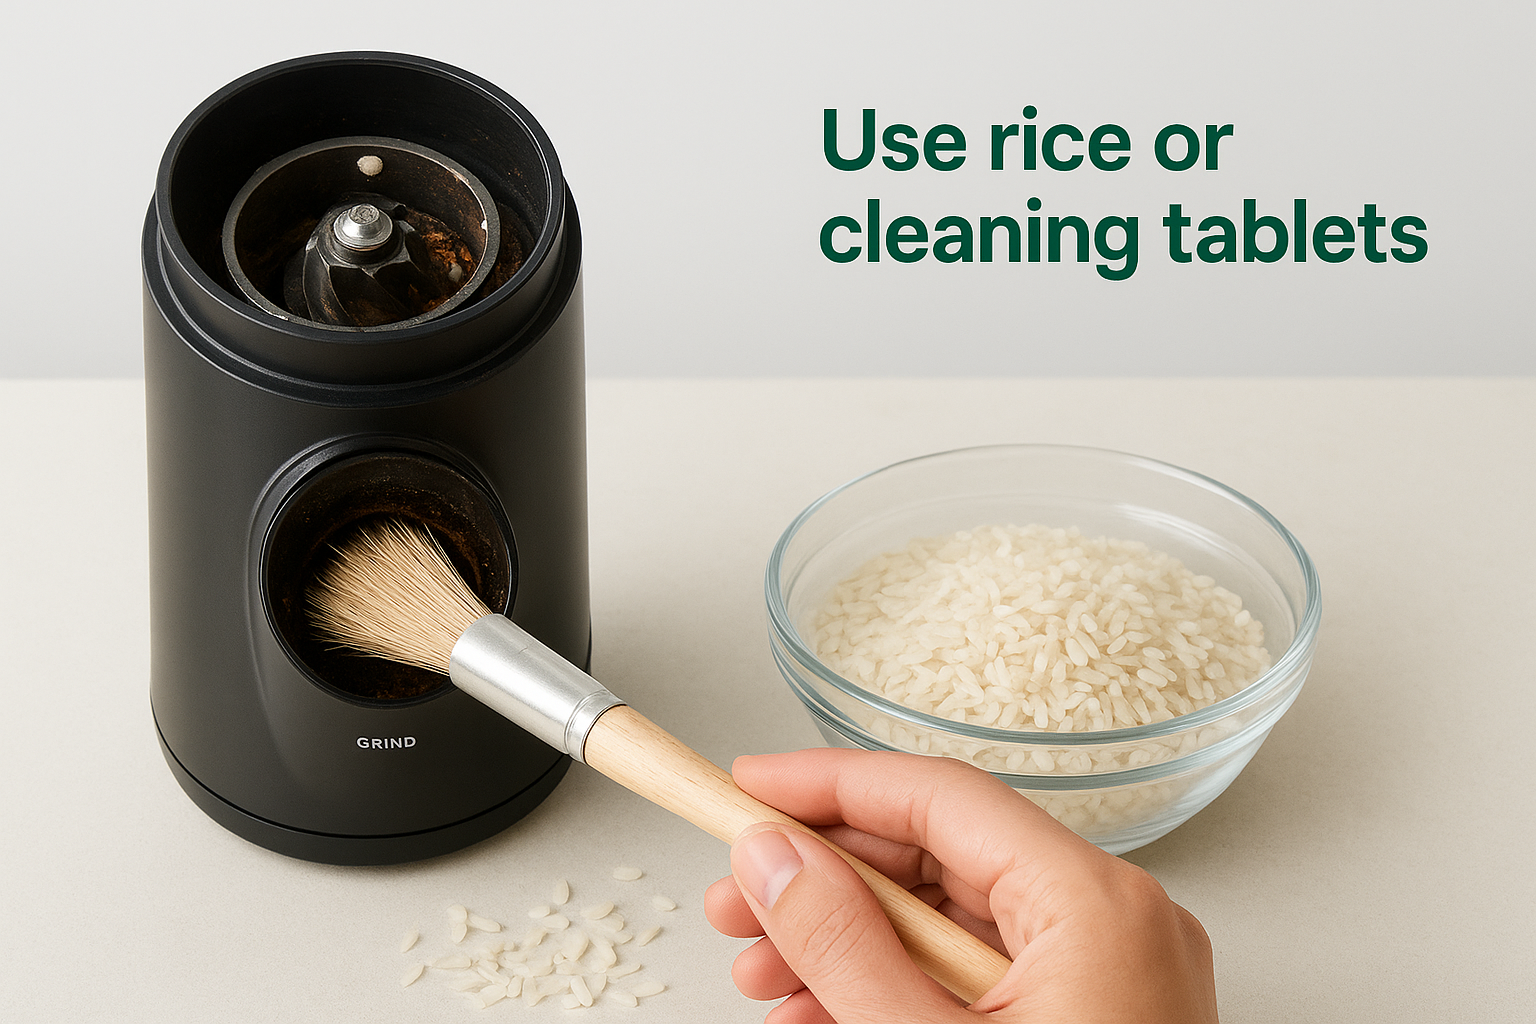
Use rice or cleaning tablets
Dry, uncooked white rice is the most accessible method for pulling oily residue out of the burrs. Run a quarter cup of dry white rice through your grinder on a normal grind setting, discard the ground rice immediately, then brush out the chamber again with a dry brush. The rice acts as a mild abrasive that absorbs oils and carries fine particle buildup out through the grinding mechanism without leaving any flavor behind.
For a more thorough clean, dedicated coffee grinder cleaning tablets such as Urnex Grindz are worth using for anyone grinding daily. Run one tablet cycle according to the product directions, then run a small amount of sacrificial coffee grounds through the grinder afterward to purge any tablet residue before your next actual brew. Skipping that purge step leaves a faint chalky taste in your first cup.
Wipe down all accessible surfaces
After the rice or tablet cycle, use dry cotton swabs to clean the grinding chamber walls, the hopper base, and the exit chute. Your exit chute accumulates oils and fines faster than any other part of the grinder since every ground passes through it, so give it extra attention with a fresh swab on each side. Check the threads on any removable hopper as well since grounds pack into them and cause stiff removal over time. Reassemble only after every surface feels completely dry to the touch.
Step 5. Keep grinders clean longer
Cleaning your grinder thoroughly is only half the work. How you use and store your grinder between sessions determines how fast residue rebuilds and how often you need to go through the full deep-clean process. A few consistent habits cut your cleaning frequency significantly and keep your grinder performing at a high level without requiring you to carve out time for a full soak every other week.
Set a cleaning schedule
A fixed schedule is the simplest grinder cleaning tip that most people skip entirely. Daily grinders need a quick clean every one to two weeks and a full deep clean once a month. If you grind two to three times per week, a quick clean every three weeks and a deep clean every six to eight weeks keeps residue from hardening into the kind of buildup that requires extended soaking and stubborn scrubbing.
Write your cleaning interval on a small sticky note and attach it to wherever you store your grinder so the reminder stays in front of you.
Use this schedule as your starting point and adjust based on how quickly your specific grinder accumulates residue:
| Usage level | Quick clean | Deep clean |
|---|---|---|
| Daily | Every 1-2 weeks | Monthly |
| A few times per week | Every 3 weeks | Every 6-8 weeks |
| Occasional | Monthly | Every 3 months |
Store your grinder properly
Keeping your grinder in a sealed container or resealable bag between uses blocks dust, debris, and ambient moisture from settling onto the teeth and screen. Leaving a grinder out on a surface for extended periods, especially in humid environments, causes sticky residue to form faster than regular use alone would produce. A simple storage bag costs nothing and adds weeks to how long your grinder stays clean between maintenance sessions.
Grind dry material only
Running wet or freshly trimmed herb through your grinder is the fastest way to reverse a clean session. Moisture binds plant material directly to the teeth and screen, and it hardens into a crusty layer once it dries. Let your herb fully dry to the touch before grinding, and your grinder will stay significantly cleaner between sessions with no extra effort required.
Keep your grinder running like new
Every grinder cleaning tip in this guide comes down to one principle: consistent, material-appropriate maintenance keeps your grinder functional and your sessions predictable. You don't need expensive tools or hours of effort. A stiff brush, isopropyl alcohol, and a basic cleaning schedule handle almost everything, and the freezer trick alone recovers more kief than most people expect the first time they try it.
Apply these methods regularly and your grinder will last years longer than one that gets ignored between uses. A clean grinder means an even grind, which means better-packed cones, cleaner burns, and no wasted herb stuck to gunked-up teeth. If you're ready to upgrade your full setup, shop premium grinders and smoking accessories at Green Blazer and pair them with RAW pre-rolled cones that burn evenly every time. Your gear works best when you take care of it, and now you know exactly how to do that.