
Learning how to roll a blunt looks intimidating the first time you try it. The wrap splits, the fill spills everywhere, or you end up with a lumpy, loose cigar that burns down one side faster than the other. You're not doing anything wrong, you just haven't seen the process broken down into steps that actually work.
This guide gives you exactly that. We'll walk through choosing the right wrap, grinding your material to the correct consistency, and packing it evenly so it burns clean from start to finish. You'll also learn the sealing and finishing techniques that keep a blunt tight without tearing the wrap, plus fixes for the most common mistakes beginners make.
At Green Blazer, we spend our days thinking about slow, even burns and clean smoking sessions, which is exactly why rolling technique matters so much. If you'd rather skip the wrap altogether, RAW pre-rolled cones for first-time users give you that same consistent burn with zero rolling required. But if you're set on mastering the blunt by hand, the same skills that go into rolling a joint step by step, follow along and you'll have a tight, even roll by the end of this guide.
What you need before you start rolling
Gathering the right supplies before you sit down saves you from stopping halfway through with a half-rolled mess in your hands. Rolling a blunt takes more than just a wrap and some ground flower, and it helps to know how a blunt differs from a joint or a spliff before you start. You need a stable surface, the right tools to grind and pack the material, and a way to seal the final product without tearing it. Skipping any of these steps is usually why a first attempt ends up loose, lopsided, or falling apart after two hits.
Pick your wrap material
Wraps come in three main forms, and each one changes the flavor, burn rate, and how forgiving the rolling process is. Tobacco leaf wraps, the kind used for actual cigars, give you the classic blunt taste and hold together well once they dry slightly. Blunt wraps, the flavored or unflavored kind sold at smoke shops, are thinner and easier to work with for beginners. Hemp wraps skip tobacco entirely and burn cleaner, which matters if you're trying to avoid nicotine altogether, though hemp and flavored wraps taste different from classic paper.
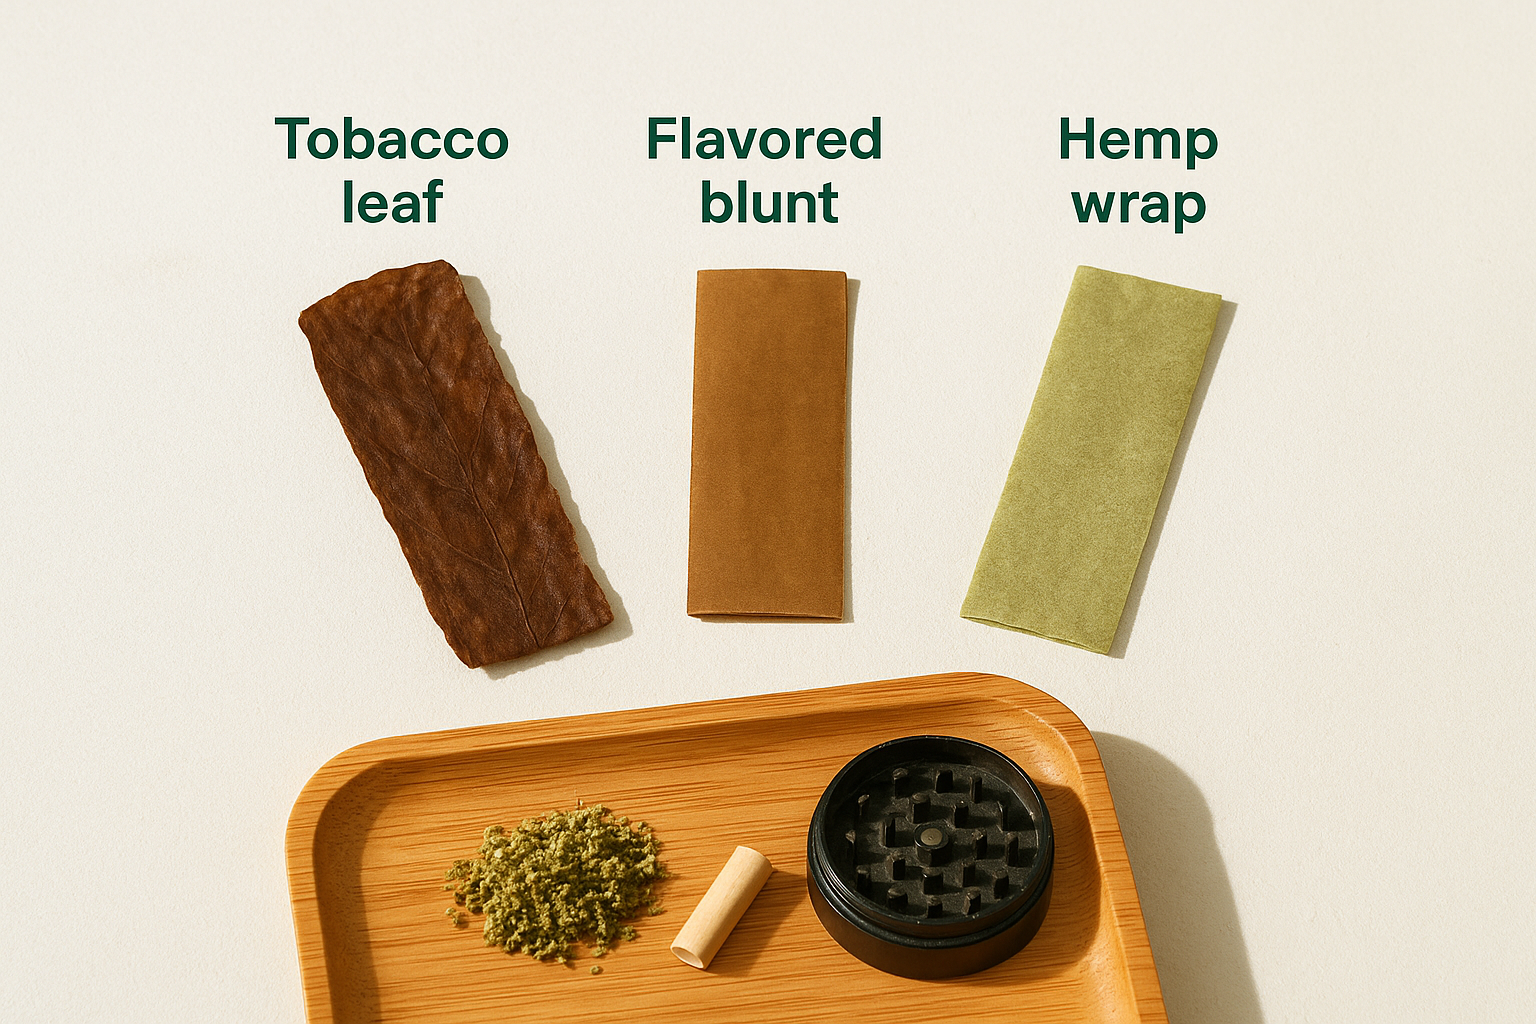
| Wrap type | Burn speed | Flavor profile | Best for |
|---|---|---|---|
| Tobacco leaf | Slow, even | Earthy, rich | Traditional blunt experience |
| Blunt wrap (flavored) | Moderate | Sweet, fruity | Beginners, flavor variety |
| Hemp wrap | Moderate to fast | Neutral, grassy | Tobacco-free preference |
The wrap you pick decides almost everything else about how the blunt burns and tastes.
Assemble your rolling kit
Having your tools laid out before you start keeps the whole process moving and stops you from handling the wrap more than necessary, which is when it tends to crack. Reaching for a grinder and knowing how to use one instead of breaking up your material by hand gives you a consistent texture that packs evenly. A flat surface or rolling tray keeps loose flower from scattering and gives you a clean spot to work.
Here's what to have on hand before you start:
- A wrap of your choice (tobacco leaf, blunt wrap, or hemp wrap)
- A grinder for consistent texture
- A rolling tray or clean flat surface
- A poking tool (a pen cap or chopstick works fine) for packing
- A lighter or hair dryer for drying and sealing the wrap
- Rolling papers or RAW rolling papers as backup or for the inner wrap (here's which rolling paper brand to pick)
- A crutch or filter tip for joints and blunts (optional, but it keeps loose material out of your mouth)
Setting up this way isn't about being fussy, it's about control. Once you start filling and rolling, you want both hands free and everything within reach. Beginners who skip this step usually end up pausing mid-roll to dig through a bag for a lighter or grinder, and that's exactly when wraps dry out and split. A few minutes of prep now means a cleaner roll later and far less frustration when you finally light up.
Step 1. Choose and prep your wrap
Once you've picked your wrap material, the real prep work starts. A wrap straight out of the package is often too dry or too tightly rolled to cooperate, and forcing it open is how most tears happen. Splitting a cigar or unrolling a blunt wrap takes patience, not force, and the few minutes you spend here decide whether you're working with a smooth, pliable sheet or a cracked mess.
Split or unroll the wrap
If you're using a tobacco leaf, run a blade or your thumbnail along the seam and gently pry it open, working from the center outward. Blunt wraps and hemp wraps usually unroll on their own, but they can still crack along the fold line if they've dried out in storage.
A dry wrap tears; a slightly damp wrap stretches.
Get the moisture level right
This is where most beginners go wrong. Too dry, and the wrap cracks the second you try to fold it. Too wet, and it turns gummy and won't hold a seal. Aim for something pliable but not soggy:
- Too dry: Run it briefly over steam from a kettle, or breathe on it lightly a few times.
- Too wet: Let it sit uncovered for a minute or two before handling.
- Just right: It bends without cracking and doesn't stick to your fingers.
Remove the stem or center vein
Tobacco leaves and some hemp wraps have a thick center vein running down the middle. Leaving it in makes the wrap fold unevenly and creates a weak point that's likely to split once you start packing. Scrape it out carefully with your poking tool or a butter knife, working from the center toward the edges without cutting through the leaf itself. Once the vein is gone and the moisture feels right, you're ready to move on to grinding, which is where the burn quality of your finished blunt really gets decided.
Step 2. Grind your cannabis to the right texture
Grind quality decides whether your blunt burns evenly or turns into a lopsided mess halfway through the session. Cannabis that's too coarse leaves pockets of air that cause your blunt to burn unevenly, while flower ground into a fine powder packs too dense and chokes the airflow, making every hit feel like sucking through a straw. You're after a texture somewhere between the two, fine enough to pack tight but loose enough to breathe.
Use a grinder, not your hands
Breaking buds apart by hand feels quicker, but you end up with an inconsistent mix of chunks and dust that burns unpredictably. A multi-chamber grinder with a kief catcher solves this by shredding the flower into uniform pieces and catching stray kief in a separate compartment. Run the grinder two or three times, checking the texture between passes instead of grinding continuously, which tends to overdo it and turn everything to powder.
Even texture means even burn, and that's the whole goal of grinding in the first place.
Check for the right consistency
Hold a pinch of ground material between your fingers and rub it lightly. It should feel like coarse sand, not flour, and you shouldn't see large stems or seeds mixed in. Here's a quick way to judge it:
- Too coarse: Chunks visible, uneven when pressed flat
- Too fine: Sticks to your fingers, compresses into a paste
- Just right: Crumbles evenly, holds shape when pinched but breaks apart easily
Remove stems and debris
Pick out any leftover stems or larger plant matter before filling the wrap. These bits don't grind down properly and end up poking through the paper or creating hard spots that won't burn at the same rate as the rest of the fill. A quick pass with your fingers over the tray catches most of it. Once your material is evenly ground and clean, you're ready to load it into the wrap, and this is where the actual shape of your blunt starts to take form.
Step 3. Fill and roll the blunt
Now that your wrap is pliable and your cannabis is ground evenly, it's time to build the actual blunt. Filling and rolling is where technique matters most, since a rushed job here undoes all the prep work you just did. Lay your split wrap flat on the rolling tray, glossy side down if there's a visible sheen, and get ready to work in a straight, even motion rather than piling everything in at once.
Lay the fill in an even line
Run your ground cannabis down the center of the wrap in a straight line, leaving about half an inch of bare wrap on each end. Aim for a line roughly as thick as your finger, thinner at the tips and slightly fuller in the middle. Uneven distribution here is the number one reason blunts burn faster on one end than the other.
Tuck and fold
Pick up the wrap with both hands, using your thumbs and forefingers to pinch the edge closest to you around the fill. Tuck that edge under the material and start rolling it forward, applying gentle, even pressure the whole way. Keep the far edge free until the tuck is tight, then bring it up and over to meet the seam.
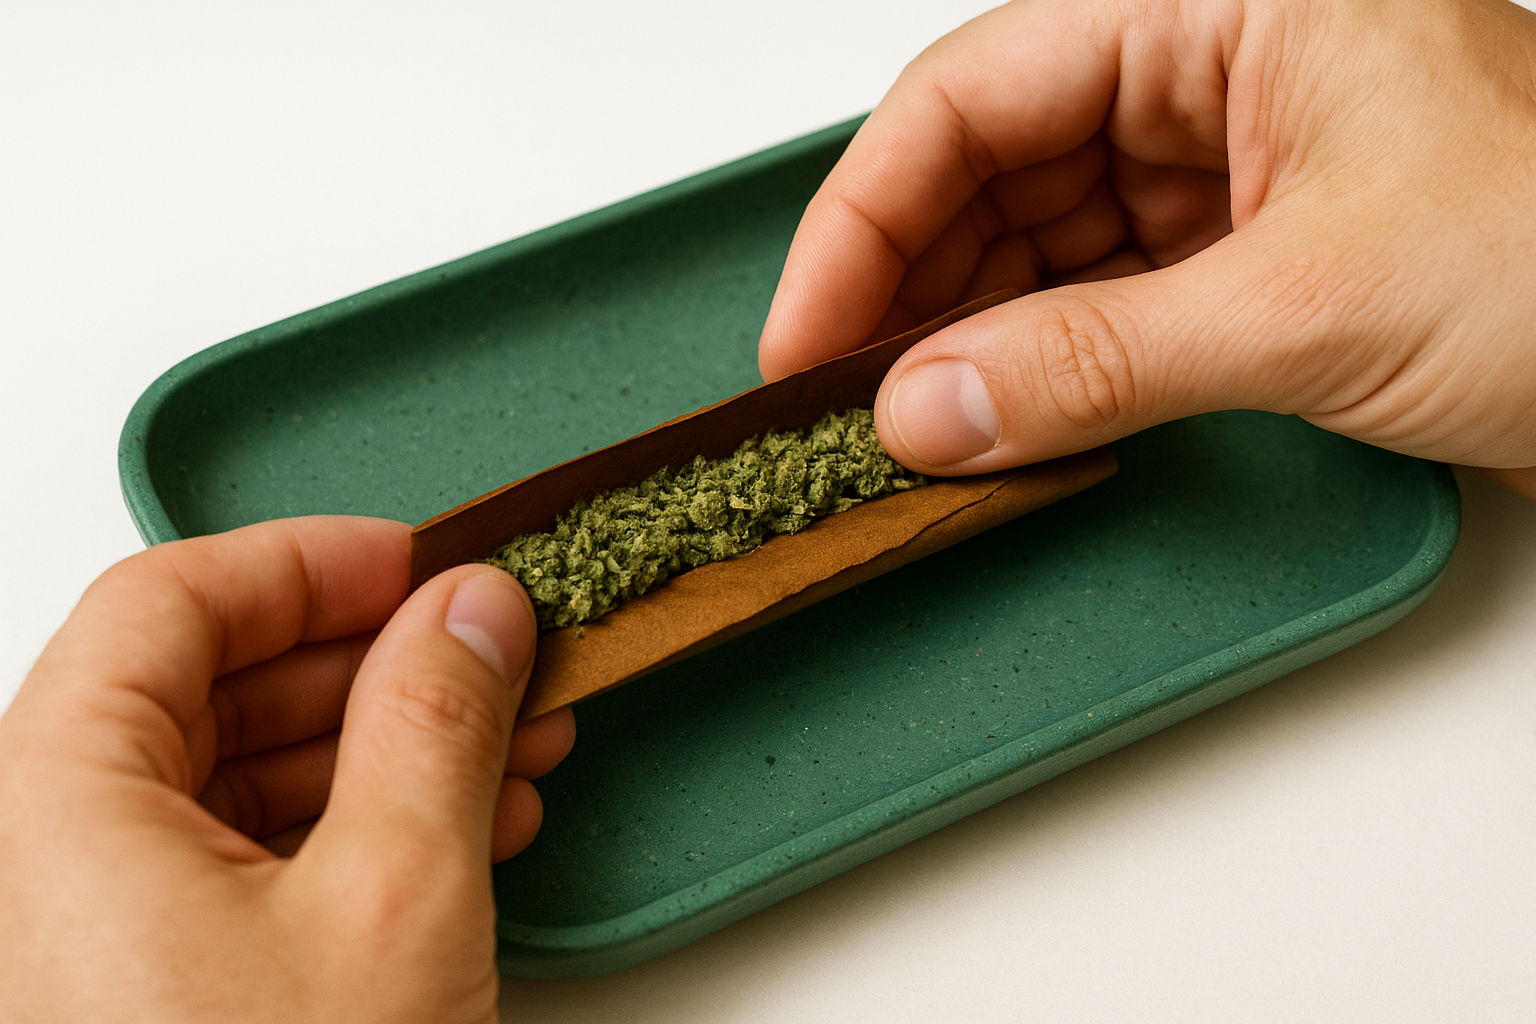
A tight, even tuck at the start is what keeps the whole blunt from unraveling later.
Pack as you go
Once the seam is closed but not yet sealed, use your poking tool to firm up loose spots without overpacking any single section. Work from one end to the other, checking for:
- Air pockets: press gently to close gaps without crushing the fill
- Loose ends: tap down any material trying to escape the tips
- Even width: the blunt should feel roughly the same thickness end to end
Good packing at this stage means less adjusting later, and it sets up the seal you're about to lay down in the final step.
Step 4. Seal, dry, and light it up
With the fill packed and the seam closed, you're down to the last few steps that decide whether your blunt holds together through the whole session. Sealing locks the wrap shut, drying firms it up so it doesn't unravel in your pocket, and lighting it correctly sets the burn pattern for everything that follows. Rushing any of these three steps undoes the careful work you put into the fill and roll.
Seal the seam
Run your tongue lightly along the exposed edge of the wrap, just enough to dampen it, then press the seam closed with your fingers. Avoid soaking it, since too much moisture makes the wrap gummy and slows the whole drying process down. A thin, even seal holds better than a thick, wet one, and it dries faster too.
A light touch on the seal beats a heavy one every time.
Dry and firm it up
Heat is what actually locks the seam, not moisture. Run a clean-burning lighter flame an inch or two below the seam, rotating the blunt slowly so the heat spreads evenly instead of scorching one spot. You'll see the wrap change texture slightly as it dries, going from tacky to firm. This step, often called heat sealing, is what separates a blunt that holds its shape from one that unravels after a few hits.
Light it evenly
Toasting the tip before your first real pull sets up an even burn for the rest of the session. Here's the order that works:
- Rotate the tip over the flame without touching it directly, toasting the outside evenly
- Take a slow test pull to check the draw and see if the cherry is forming evenly
- Touch the flame directly to any spot that isn't catching
- Puff gently for the first few hits to establish the burn line
If you'd rather skip these steps entirely, RAW pre-rolled cones give you that same slow, even burn with no rolling, sealing, or toasting required, since all you do is pack a cone for a slow, even burn.
Rolling with confidence
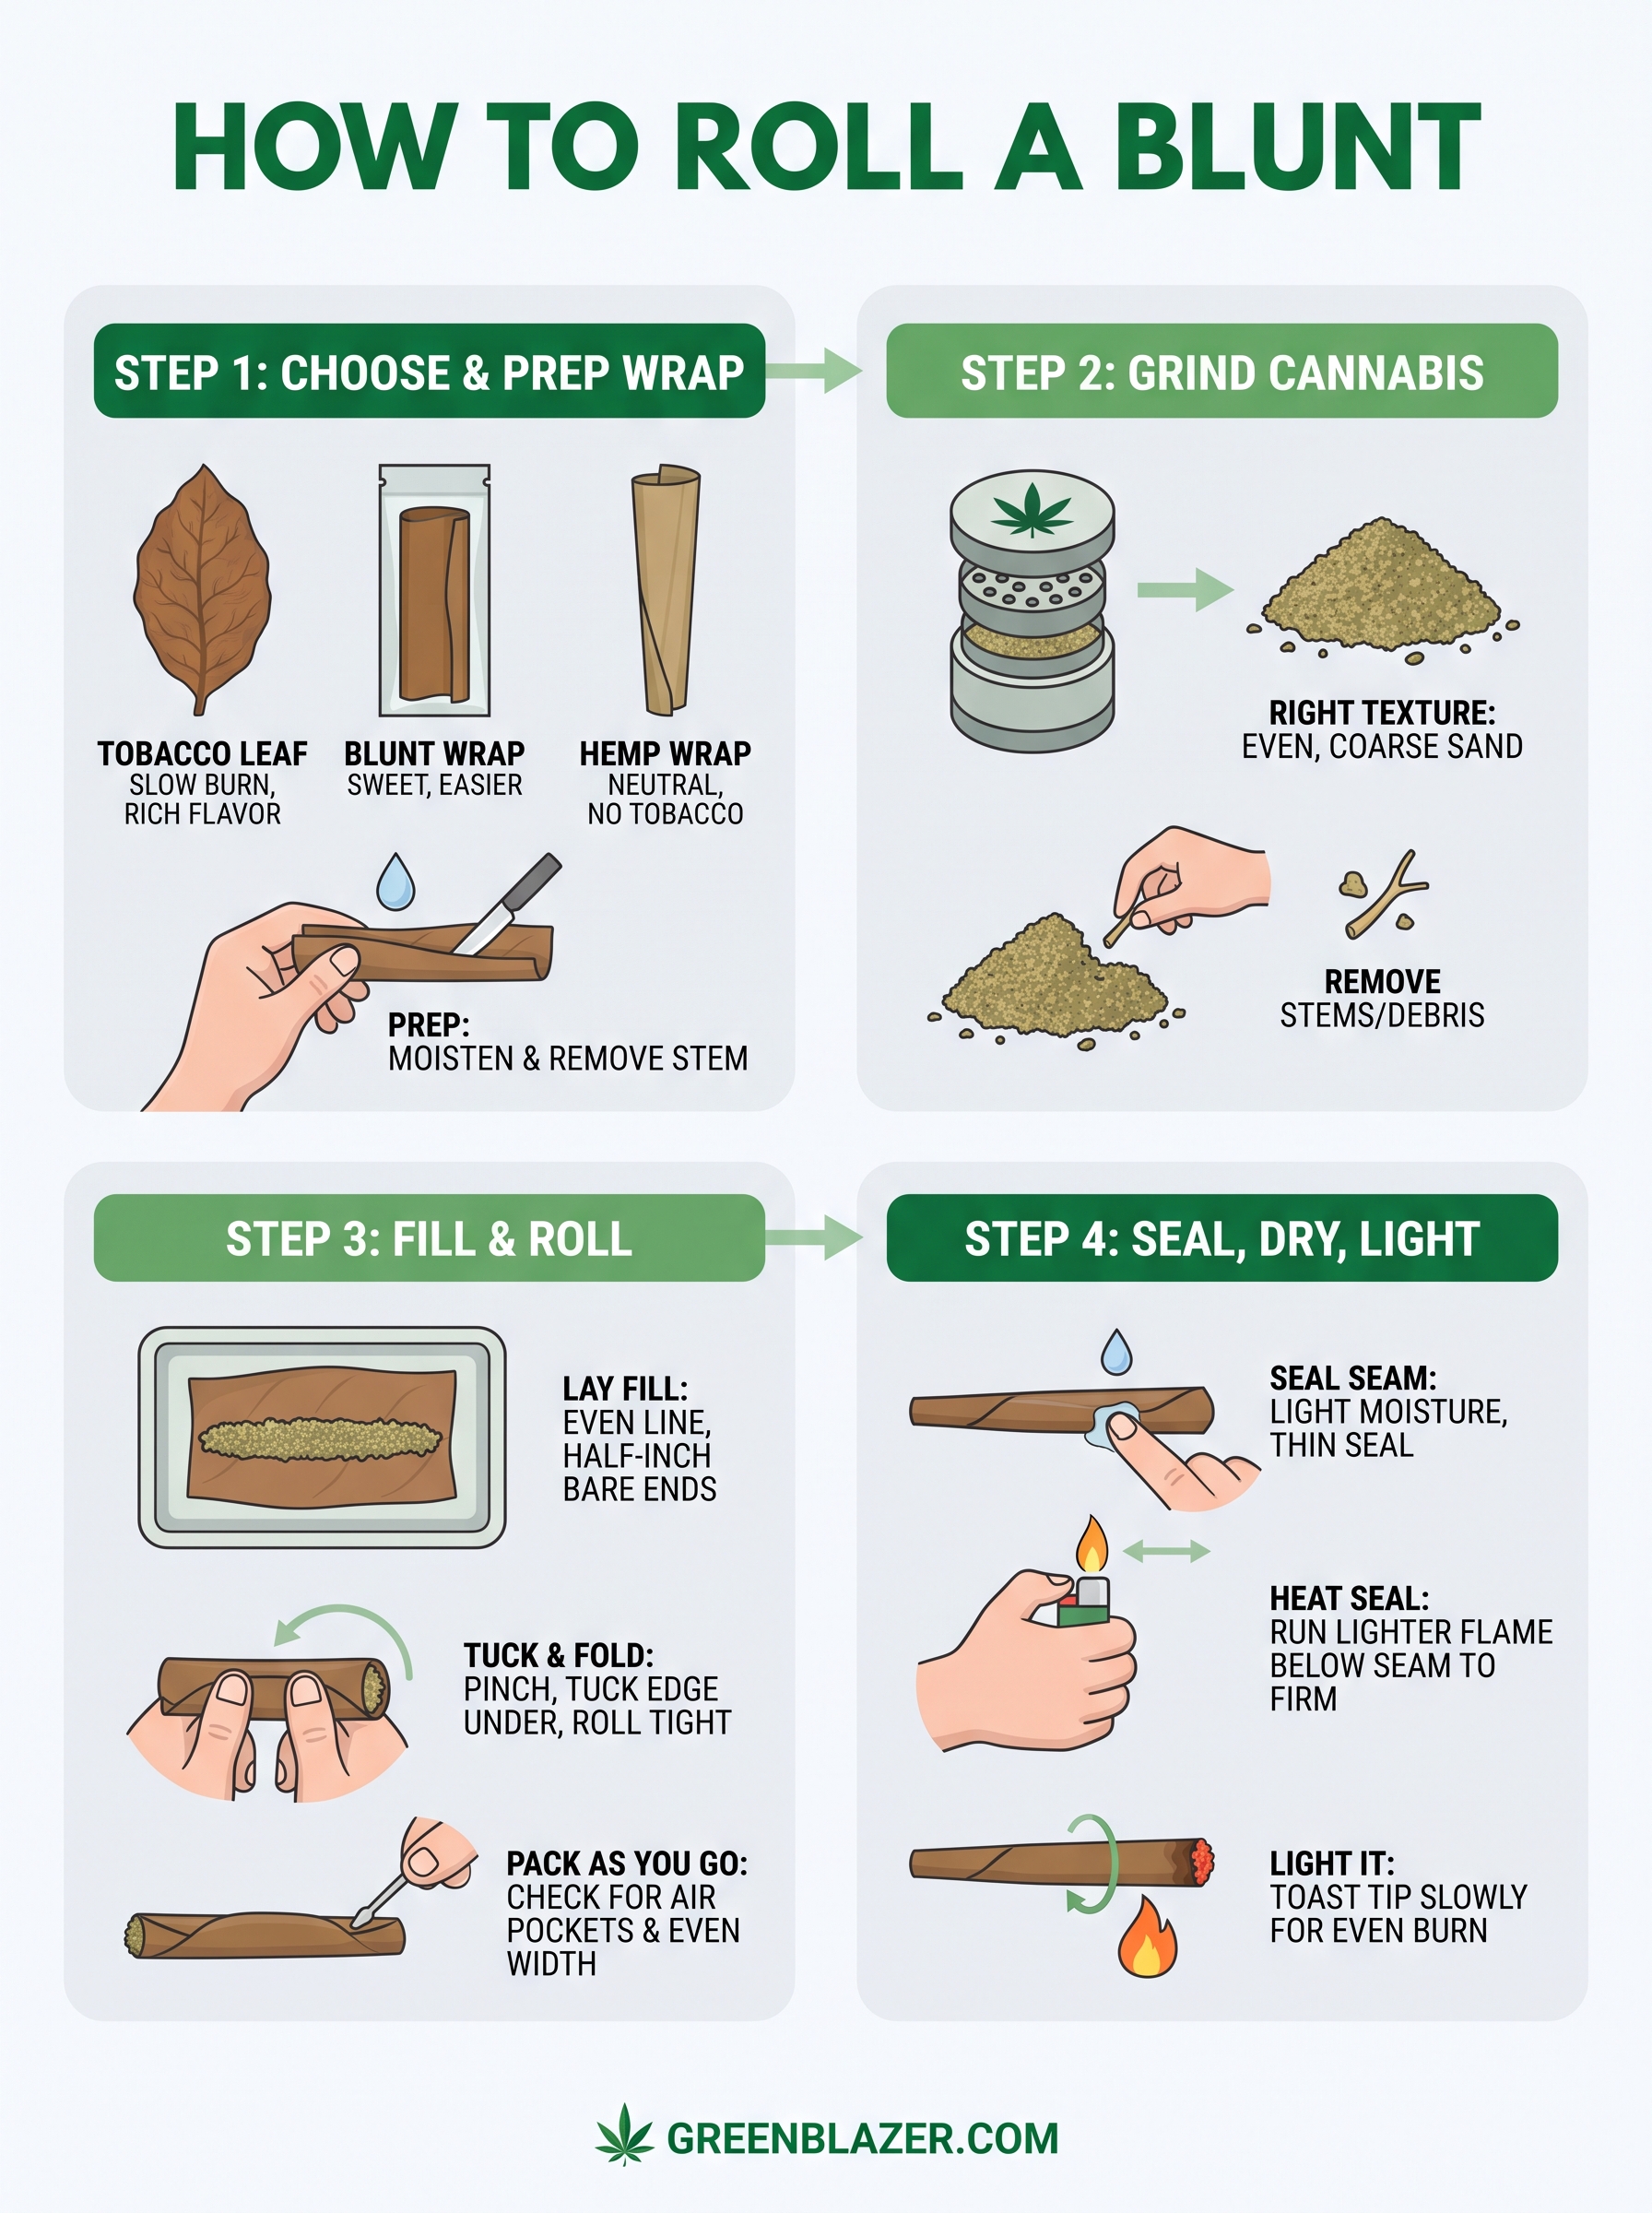
Rolling a good blunt comes down to four things: a properly prepped wrap, evenly ground cannabis, a tight and consistent pack, and a seal that holds without drowning the paper. Miss one of those steps and you'll feel it in the burn, whether that's a canoe down one side or a seam that pops open in your pocket. Practice fixes most of this. Your first few attempts won't look perfect, and that's fine. Pay attention to what went wrong each time, whether it was moisture, grind texture, or an uneven fill, and adjust the next round.
Eventually the whole process becomes muscle memory, and a tight, even blunt stops feeling like a project and starts feeling routine. But if you'd rather skip the learning curve on busy days and still get that slow, consistent burn, grab a pack of RAW 1 1/4 size pre-rolled cones and let the rolling be someone else's job.
